Toolset allows you to load any type of posts from the database and display them, as fancy lists, on the front-end. A list can appear in any way you choose. It can be a responsive grid, masonry or collage layout, or any other style you wish.

In Toolset, we call such a list of posts a View.
A View allows you to easily create a query and select exactly which posts to get from the database. Then, you design how to display that list of posts on the front-end.
Steps for creating a View
- To start, edit or create a page, post or a template and insert the View block.
- Use the WordPress Block Editor to design your View.
- Use Toolset blocks to add dynamic fields to the template.
Now, you can enhance your View with advanced features. For example, you can add pagination and infinite scrolling, front-end sorting, filter the list, add a custom search, or display View items on a map.
For instructions, see below.
Display Dynamic Sources using WordPress core and popular block plugins

Toolset comes with a big collection of blocks to display dynamic sources (custom fields, WordPress fields, and taxonomies). However, you can also display Dynamic Sources using WordPress core blocks and popular block plugins.
Use the following steps to display a Dynamic Source in any supported block:
- Insert or select a block.
- In the right sidebar, expand the Dynamic Sources section.
- Toggle on the option for any of the supported fields in that block.
- Use the dropdowns that appear to select the dynamic source you want this block to display for that field.
Display Dynamic Sources inside all text blocks

Toolset allows you to display Dynamic Sources, like custom fields, inside any text blocks like headings, buttons, and more. This includes WordPress core blocks, Toolset blocks, and popular block plugins.
To display any Dynamic Source inline, insert or select a block with a text input and look for the Inline Fields button. Dropdown menus will appear, allowing you to select a Dynamic Source.
For more information, check out the lesson about displaying Inline Fields.
How to style a View

Toolset blocks allow you to design and style everything inside the block editor.
Different Toolset blocks will have different styling options. The most common styling options are:
- Typography – change the appearance of blocks that output text
- Style Settings – change colors, margins, paddings and borders, drop shadows and more.
- Advanced – block allignment, hide element, and more.
Besides styling the blocks themselves, there are two Toolset blocks that help you design your Views:
- Toolset Container – group multiple blocks and apply styling to them: add a background, margins, paddings, and more.
- Toolset Grid – display elements side-by-side in any type of columns: adjust column width, number of columns, and more.
For detailed tutorial on this topic, see the lesson about styling Views.
Change the main View settings
You can change the View’s main options at any time. This includes things like pagination, content selection, ordering, filtering, and more.
Click to select the main View block and then use the sections in the right sidebar to tweak the main settings.
Change the loop style of a View
By default, the View display posts in a three-column grid. You can easily change this at any time.
Click to select your View in the editor and then click the Block Navigation button. You will see a tree list of your View and the blocks it contains. Click the View Loop to select it.
Add pagination to a View

Pagination lets you break otherwise long lists of posts into pages and allows visitors to switch between them. Using pagination, you can also add the Infinite Scrolling effect to your Views.
By default, pagination is turned on when creating a new View. You can click the pagination controls and tweak the options using the right sidebar.

Enable pagination for an existing View
If you have an existing View without pagination you first have to enable it. To enable pagination, select your View block in Block navigation and expand the Pagination section in the right sidebar. There, click the option to enable pagination and tweak the options.
Add front-end sorting to a View

Allowing users to sort the list of posts by price or rating, for example, helps them find the right content more easily.
To enable sorting for a new View, toggle the Front-end sorting option in the View-creation wizard.
To add sorting controls to an existing View use the following steps:
- Click the Add Sorting button. You can find it at the top and bottom of the View Output block.
- Click the sorting control that appears and use the right sidebar to select the options.
You can select what to sort by, adjust the labels, tweak the styling, and more.
Filter the list of posts

By default, a View outputs all posts belonging to the post type you selected. You can add filters to display only posts that meet a certain criteria.
You can filter a View’s output by custom fields, taxonomies, standard post fields, post relationships, and more.
Use the following steps to add a filter to a View:
- Click to select the main View block.
- In the right sidebar, expand the Content Selection section and look under its Query Filter subsection.
- Click Add a filter and in the dialog that appears, select what to filter by.
- In the right sidebar, select the options for your new filter.
Add a custom search to a View
Toolset allows you to easily add a front-end search to your Views. This allows users to easily find the exact content they are looking for.
To enable custom search for a new View, toggle the Search option in the View-creation wizard.
To enable custom search for an existing View use the following steps:
- Click to select the main View block.
- In the right sidebar, toggle the Search option and a View Search section will appear in the editor.
- Click the buttons in the View Search section to add a search field, submit button, and more.
To change the main options for your search, click to select the main View block and in the right sidebar expand the Custom Search section.
For detailed information, check out the lesson about creating a custom search.
List items of a repeatable field group
You can make an entire group of fields “repeatable”. For example, if you’re making a site about gyms (or stores), you could store the “opening hours” which have the “day of the week” and “working hours”, as a repeatable fields group.
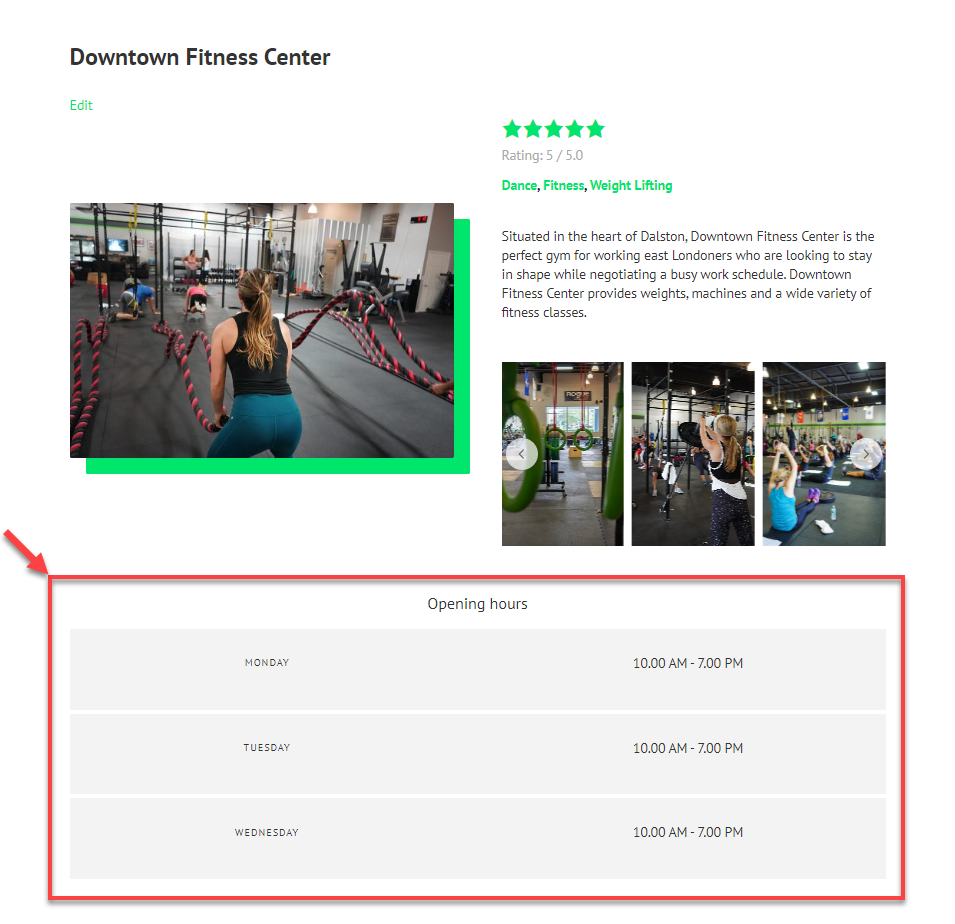
Use the following steps to display repeatable field groups.
- Edit the Content Template for single posts of the related post type.
- Insert a View block, give it a name, and select the design options.
- In the third step of the View creation wizard, select your repeatable field group, under the Repeatable field groups sub-section.
- In the Block Editor, click to select the main View block you just created.
- In the right sidebar, expand the Query Filter section and click the Add a filter button.
- In the dialog that appears, select the Post relationship or repeatable field groups owner option.
- In the right sidebar, use the Select items dropdown to select your repeatable field group and click the Save button.
For detailed instructions, visit the lesson about creating and displaying repeatable field groups.
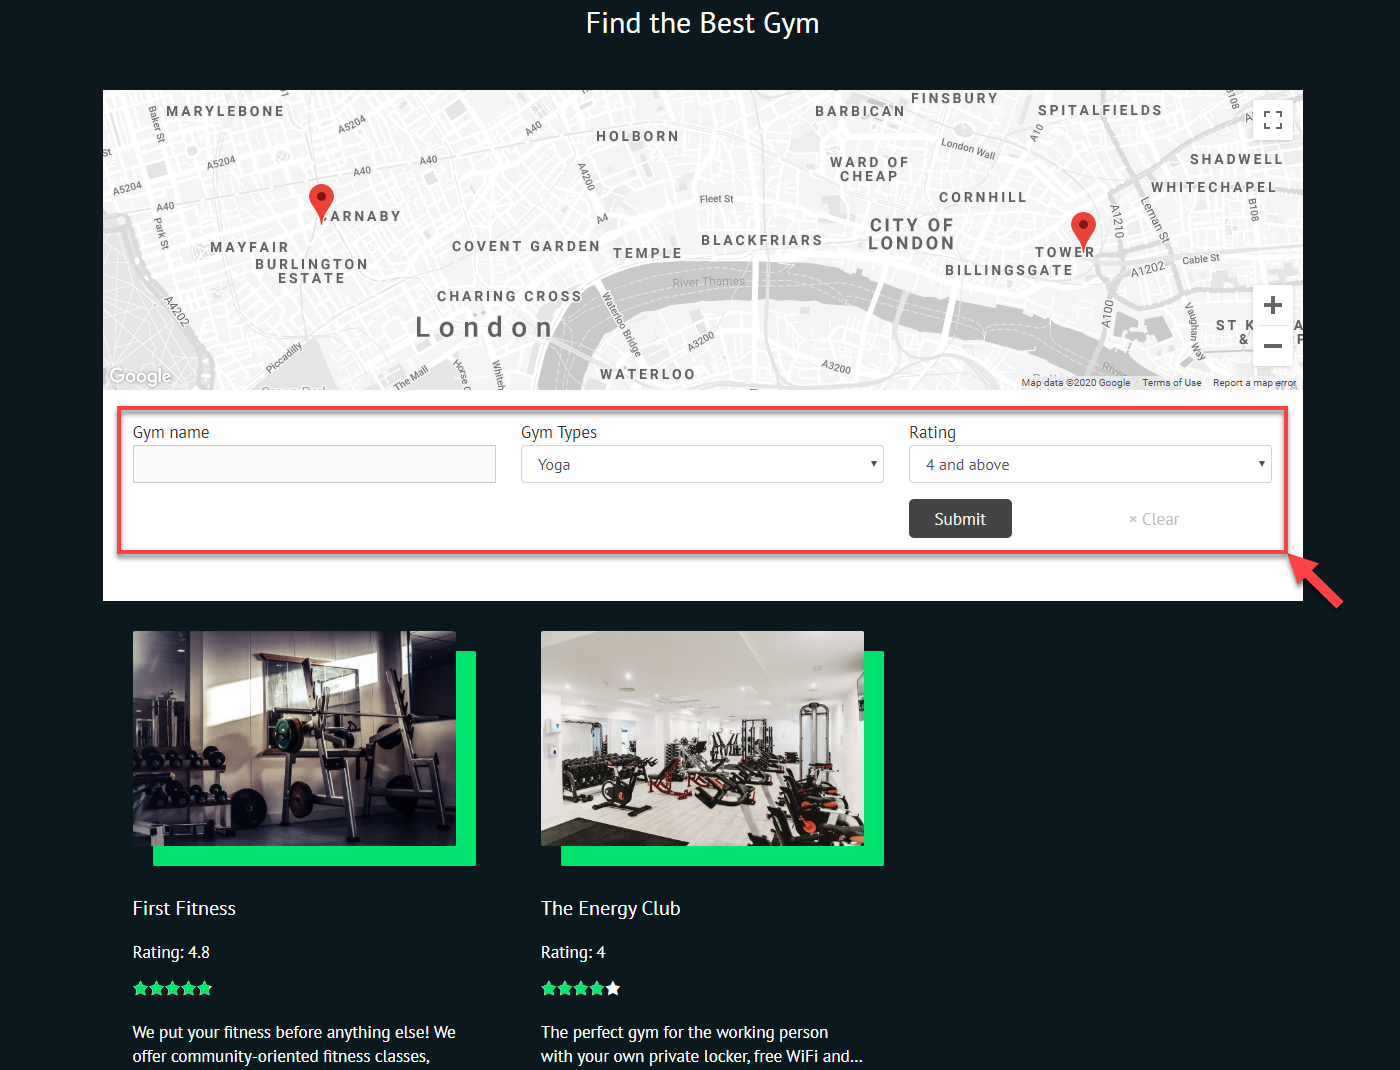
Displaying View items on a map
The View can also display items on a map.
Use the following steps to add a map to a View:
- Edit the page that holds your View with a custom search and insert the Toolset Map block.
- In the right sidebar, scroll down to the section for the map marker.
- In the Source for the marker option, select View block and make sure your View with a custom search is selected.
For a video tutorial and more information see the lesson about displaying a list of posts on a map.
Main Toolset Block Used in this Lesson

Create custom lists of posts
Related topics
- Filtering Custom Lists of Posts
- Filtering Toolset Views by Dates
- Enabling Legacy Version of Toolset Views
- Styling Custom Searches
- Styling Views and Archives
- Adding Custom CSS to Templates, Archives and Views
- Passing Arguments to Views
- Adding Custom JavaScript to Views, Templates and Archives
- Display Dynamic Sources Inside all Text Blocks
- Displaying Form Data
- Displaying a List of Posts on A Map
- Creating Sliders with Dynamic Post Content
- Adding Dynamic Content to Your Homepage
- Creating Responsive Columns and Grids
- Display Content Conditionally
- Using Third-Party Hidden Fields
Need help?
If you bought Toolset, log-in to your account and post your questions in Toolset technical support.
Not a client yet? Find the account that’s best for you.