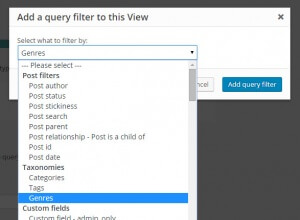
Normally, WordPress displays posts that belong to taxonomy in the standard Taxonomy archive pages. Views lets you display these posts in much more flexible ways and let visitors select the taxonomy to filter by.
Let’s look at an example. We’ll create a site for Bands. Bands will be organized by Genres. So, the bands will be custom post types and the genres will be taxonomy.
We want to offer visitors a list of genres. When they click on an item, they would go to a page that shows all the bands that belong to that genre.
Because we want to have complete control over that output, we don’t want to use the WordPress taxonomy archive loop, but have the output coming from a View.
Overview of the solution:
- Create a View that lists Genres. We’ll call it ‘Genres View’.
- Create another View that lists Bands, filtering by Genre. We’ll call it ‘Bands in Genre View’.
- Set the Genre filter in the Bands in Genre View to come from a URL argument.
- Insert both Views into standard WordPress Pages.
- In the Genres View, link to the Bands in Genre View with the selected Genre in the URL.
Ready? Let’s get started!
1. Allow to filter the taxonomy via a URL argument
The core of the implementation is to filter the View which lists bands, according to the taxonomy. But, instead of choosing the taxonomy in the View settings, we leave it to come from the URL. This way, we allow the page that links to the bands page to choose the taxonomy for the filter.
This is the Query section for the Bands in Genre View – select to filter by the Genre taxonomy:

Once you have selected your filter, you can set the filter options – chose to filter by URL parameter:
You can see that it’s filtering results by the ‘Genre’ taxonomy, with values coming from a URL argument called ‘wpvgenre’. We can use any name that we want, as long as it’s consistent with the next step (keep reading).
When we insert this View into a page, it will filter the results according to the taxonomy specified in the URL of the page.
So, if we display a pages like:
mysite/filtered-bands/?wpvgenre=rock
The View will display all the bands that belong to the genre Rock.
2. Set the URL parameters to include the clicked taxonomy
Now, we’re going to the page that lists genres. That list comes from a View, which just queries all the genre taxonomy items.
When we display the results, we do something like:
[wpv-layout-start]
<!-- wpv-loop-start -->
	<ul>
		<wpv-loop>
		<li><a href="/filtered-bands/?wpvgenre=[wpv-taxonomy-slug]">[wpv-taxonomy-title]</a></li>
		</wpv-loop>
	</ul>
<!-- wpv-loop-end -->
[wpv-layout-end]
Did you notice what happens here?
The genre names are linking to a standard WordPress page, which includes the Bands in Genre View that we created. We’re including the name of the genre in the URL, as the value of the genre-selection argument.
This way, when the visitor clicks on any genre name, she goes to the page that lists filtered genres, and she gets just the bands that belong to the requested genre.
Challenge for you
Once we’re already on the page that lists bands that belong to a specific genre, how can we allow visitors to quickly choose a different genre and update the display results?
(hint: enable custom searches and display the filter on that page too)
