Toolset provides a series of hooks that let you extend its functionality for custom cases, or even for adding extra features not supported in the core plugins.
To use hooks, you need some background in PHP. Once you get your hands on the hooks, they are quite easy to use; but some confidence while writing code is a must. It is also important to be a little familiar with the concept of hooks in the WordPress ecosystem.
However, the documentation provided by WordPress assumes you already know a little about all of this, so let’s start with the basics.
Hooks: actions and filters
Hooks belong to the WordPress way of managing things. Hooks do not exist in vanilla PHP; they exist because WordPress provides an API for them. So, you can use hooks because WordPress allows you to.
But what are hooks? A hook, by definition, is a way to step in the natural workflow of the code at a given moment. Think of the moment when you save a new post, or the moment when you display a post title in the frontend of your site. Hooks give you the ability to modify the post before it gets saved, or to modify the post title before it gets displayed.
You can think of a hook as a point where you can register things to happen. It is like a registry of callbacks that need to be executed at a given point.
Working with hooks involves two things:
- You need to know the name used to execute the hook.
- You need to write a callback that gets hooked into the hook name and does the modification that you aim to do.
All hooks can get passed a series of parameters Your callback can use one or many of those parameters to adjust what it does.
There are two basic types of hooks: actions and filters.
Actions
Actions are hooks that do something. WordPress, as well as Toolset, is full of actions happening here and there to modify the natural workflow of the code.
For example, Views stores some cache that avoids querying the database every time we need a list of the available custom fields. When a new field is added to the database, we need to declare that the stored cache is obsolete and delete it. We do this through an action.
The basic syntax of a hook is as follows:
// This happens when the action is executed
do_action( 'my_action_name' [, $arg_1] [, $arg_2][...] );
// This happens when hooking into the action
add_action( 'my_action_name', 'my_action_callback', 10, 2 );
function my_action_callback( [$arg_1][, $arg_2][...] ) {
    // Perform your action here
}
Some things to notice:
- The action gets executed by do_action. The first argument for this function is the action name. It can take as many other attributes passed to the action as needed, and it can even take no other argument at all.
- The callback is declared by add_action. The first argument for this function is the action name that you want to hook into, and the second is the name of the callback that will get executed. Those two arguments are mandatory. The third argument is optional and is called priority. The higher the priority, the later will the hook be added to the list of callback executed for this given action (priority 1 happens before priority 100), and it defaults to 10 when not set. The fourth argument is also optional and is called accepted_args. It is also a number that states how many extra parameters will get passed to your callback.
- Action callbacks do not need to return anything. In fact, even if they return something, you cannot access what was returned, so avoid doing it.
Let’s further describe priority and accepted_args.
Priority
By default, actions are hooked into priority 10 of their caller. When two callbacks are hooked into the same priority, the one registered before gets executed first. The priority argument lets us execute some callbacks before other callbacks, or even later. It is theoretically possible to execute your callback before anything else using negative values (although not recommended) or after anything else using the highest integer that the system can deal with, as PHP_INT_MAX.
Accepted arguments
While actions can take no extra arguments, it is common that at least one gets passed. $accepted_args defaults to 1; so if you do not state otherwise, your callback will get either none or just one argument. In case your action can pass more than one argument and your callback needs it, you need to specify the number of arguments you are expecting.
Also, notice that this is the fourth argument of add_action, so if you need to specify a value here, you also need to specify a value for priority.
Let’s see some examples:
Action without arguments
// This action does not take any arguments
do_action( 'my_action_name_one' );
Hook into it like this
// You can hook here like this
add_action( 'my_action_name_one', 'my_callback_one_default' );
function my_callback_one_default() {
    // Do something
}
// You can hook here later like this
add_action( 'my_action_name_one', 'my_callback_one_later', 20 );
function my_callback_one_later() {
    // Do something
}
Action with just one argument
// This action takes one argument
do_action( 'my_action_name_two', $arg );
Hook into it like this
// You can hook here like this
add_action( 'my_action_name_two', 'my_callback_two_default' );
function my_callback_two_default( $arg ) {
    // Do something
}
// You can hook here later like this
add_action( 'my_action_name_two', 'my_callback_two_later', 20 );
function my_callback_two_later( $arg ) {
    // Do something
}
Action with more than one argument
// This action takes two arguments
do_action( 'my_action_name_three', $arg_one, $arg_two );
Hook into it like this
// You can hook here like this
add_action( 'my_action_name_three', 'my_callback_three_default' );
function my_callback_thee_default( $arg_one ) {
    // Do something
}
// If you need to deal with $arg_two you need to hook here like this
add_action( 'my_action_name_three', 'my_callback_three_default_extra', 10, 2 );
function my_callback_three_default_extra( $arg_one, $arg_two ) {
    // Do something
}
// You can hook here later like this
add_action( 'my_action_name_three', 'my_callback_three_later', 20 );
function my_callback_three_later( $arg_one ) {
    // Do something
}
// And you can hook later and use all the arguments
add_action( 'my_action_name_three', 'my_callback_three_later_extra', 20, 2 );
function my_callback_three_later_extra( $arg_one, $arg_two ) {
    // Do something
}
Filters
The syntax for filters is very similar to the one for actions, but with a great difference: instead of doing something, filters are used to modify something.
Because of that, filters always get at least one argument. And while action callbacks do not return anything, filter callbacks are required to return something. This is really important: a filter failing to return a value will pass an empty argument to all callbacks hooked after it. It is worth noting that the value to be filtered is the first argument passed to the callback, and the one needed to be returned.
The basic syntax is as follows:
// This happens when the filter is applied
$value = apply_filters( 'my_filter_name', $value [, $arg_one][, $arg_two][...] );
Hooking into the filter
// This happens when hooking into the filter
add_filter( 'my_filter_name', 'my_filter_callback', 10, 3 )
function my_filter_callback( $value[, $arg_one][, $arg_two][...] ) {
    // Do something here to modify $value
    return $value
}
The general functionality is the same as for actions, counting that an argument is always passed and something must be always returned, so we will not repeat the examples for priority and accepted_args usage.
Hooks in Toolset
Toolset provides a growing API of hooks to either perform some actions at given points or modify data using filters. In fact, a lot of the core functionality in Toolset plugins is based upon internal actions and filters.
Because of that, we need to separate public and private hooks. Public hooks are supposed to be used by third party developers and users, to extend the Toolset functionality or add missing features. Internal or private hooks affect the core behavior, and code outside the Toolset family should not entangle with it.
Toolset developers should document whether a hook is public or private in the usual docblock for the hook in the code. In public documentation, we should only document and offer examples for public hooks.
Existing hooks
By now, we have documented a large number of hooks for the Toolset family:
- Types does not have a proper hooks API
- Views hooks API
- Forms hooks API
- Layouts framework hooks API
- Access has a limited hooks API
- Toolset Maps does not have a proper hooks API
Using hooks in Toolset
Each hooks API contains or should contain documentation on the hooks on when they run and what they can be used for.
For example, Views hooks are useful to modify what is being queried, or how something is displayed. Forms hooks let you put your foot in the process of submitting a form, and adjust what gets saved or not. Layouts hooks let you modify what gets output in the frontend. Access hooks can be used to register new capability sections in the admin interface.
Let’s see some examples:
Views hooks
Let’s see a complete example of a Views action and a Views filter.
Imagine we have a set of posts, and a View that displays a parametric search for those posts. We want to track how many times a given post is displayed, so we better know which items are being seen and match the searches from visitors more often. To do so, we have a custom field to store the times a post has been rendered, and we want to increase it every time it gets seen.
Views has an action being executed every time a post is displayed on a Views loop, wpv-after-display-post, and it takes two arguments: $post object and $view_id being rendered.
Let’s assume that our View has an ID of 44, and the field where we store the counter has a slug of my_counter.
// Add our callback
// Mind that we set a priority of 2 and we expect 2 arguments
add_action( 'wpv-after-display-post', 'my_count_on_views', 10, 2 );
// Define our callback
function my_count_on_views( $post, $view_id ) {
    if ( $view_id == 44 ) {
        // Only do something if the current View is our View, with ID 44
        $counter = get_post_meta( $post->ID, 'my_counter', true );
        $counter = $counter + 1;
        update_post_meta( $post->ID, 'my_counter', $counter );
    }
}
Now, let’s see a filter.
Imagine that you have a set of seven different Content Templates and wish to use one of the on each day of the week to display posts of a given post type called schedule. Views has a filter called wpv_filter_force_template that can force a Content Template to be used in a wide range of scenarios.
wpv_filter_force_template can take up to three arguments: the Content Template ID to be applied, the post ID being affected, and a third argument with a variable content depending on the current scenario: single-{post-type}, archive-{post-type}, listing-{post-type}, where post-type is the post type of the current post, and the prefix depends on whether you are using the Content Template for a single post, as part of the post type archive, or as part of a View listing posts of that type.
In our case, we need to target single-schedule and force apply a known Content Template depending on the current day of the week.
// Add our callback
// Mind that we set a priority of 99 and we expect 3 arguments
add_filter( 'wpv_filter_force_template', 'prefix_fixed_content_for_visitors', 99, 3 );
// Define our callback
function prefix_fixed_content_for_visitors( $template_selected, $id, $kind ) {
    if ( $kind == 'single-schedule' ) {
        // Only do something in that scenario
        $today = date( 'N' );
        switch( $today ) {
            case 2:// Tuesday
                // The Content Template for Tuesdays has an ID of 42
                $template_selected = 42;
                break;
            case 3:// Wednesday
                // The Content Template for Wednesday has an ID of 43
                $template_selected = 43;
                Break;
            case 4:// Thursday
                // The Content Template for Thursday has an ID of 44
                $template_selected = 44;
                Break;
            case 5:// Friday
                // The Content Template for Friday has an ID of 45
                $template_selected = 45;
                Break;
            case 6:// Saturday
                // The Content Template for Saturday has an ID of 46
                $template_selected = 46;
                Break;
            case 7:// Sunday
                // The Content Template for Sunday has an ID of 47
                $template_selected = 47;
                Break;
            default:// Monday
                // The Content Template for Monday has an ID of 41
                $template_selected = 41;
                break;
        }
    }
    return $template_selected;
}
Forms hooks
Imagine that you want to redirect to different pages after a form is being submitted, based on the current user role. For example, default guests should use the redirection set in the form settings, but admins and editors should go to another page, and authors should go to a different page too.
We can use the cred_success_redirect filter for that. It can take up to three arguments: the current redirection target, the post being added or edited, and the form posted data. Among that form data, we can extract the form ID, so we can target our specific form submission.
Let’s say our form has an ID of 12.
// Add our callback
// Mind that we set a priority of 10 and expect 3 arguments
add_filter( 'cred_success_redirect', 'custom_redirect', 10, 3 );
// Define our callback
function custom_redirect( $url, $post_id, $form_data ) {
   if ( $form_data['id'] == 12 ) {
        $user = wp_get_current_user();
        if ( in_array( 'author', (array) $user->roles ) ) {
            // Set redirect for authors
            $url = 'http://my-site.com/target-page-for-authors/';
        }
        if (
            in_array( 'editor', (array) $user->roles )
            || in_array( 'administrator', (array) $user->roles )
        ) {
            // Set redirect for editors and administrators
            $url = 'http://my-site.com/target-page-for-editors-and-admins/';
        }
   }
   return $url;
}
Layouts hooks
Layouts front-end hooks are basically used to extend or override any HTML structure rendered in the frontend. Because of that, Layouts hooks are better used in a group and to define support for a given specific framework.
A complete example can be found in the dedicated documentation. Please note that the examples included are using anonymous functions, which are not supported on PHP below 5.3.
Access hooks
Access only provides a hooks API for registering custom tabs in the Access Control admin page. A good example on how it is done can be seen on the Forms integration for Access.
First, we define a custom tab for Forms in the Access Control page:
// Add our callback
// Mind that we do not set priority or number of expected arguments, so it defaults to 10 and 1
add_filter( 'types-access-tab', 'register_access_cred_tab' );
// Define our callback
function register_access_cred_tab( $tabs ) {
	$tabs['cred-forms'] = __( 'CRED Forms', 'wp-cred' );
	return $tabs;
}
Then, we register areas on that tab. Mind that the action to do so is types-access-area-for-{tab-slug}, which in our case is types-access-area-for-cred-forms:
// Add our callback
// Mind that the filter name is variable and depends on the tab slug, and that we do not set a priority or number of expected arguments, so defaults to 10 and 1
add_filter( 'types-access-area-for-cred-forms', 'register_access_cred_area' );
// Define our callback
function register_access_cred_area( $areas ) {
        $CRED_ACCESS_AREA_NAME = __( 'CRED Frontend Access', 'wp-cred' );
        $CRED_ACCESS_AREA_ID = '__CRED_CRED';
        $areas[] = array(
                'id' => $CRED_ACCESS_AREA_ID,
                 'name' => $CRED_ACCESS_AREA_NAME
        );
        return $areas;
}
Now, we register groups within areas. Mind that we define the group based on the area id defined above. The filter passes the array of groups to register into, and the area $id being populated.
// Add our callback
// Mind that we set a priority of 10 and expect 2 arguments
add_filter( 'types-access-group', 'register_access_cred_group', 10, 2 );
// Define our callback
function register_access_cred_group( $groups, $id ) {
        $CRED_ACCESS_AREA_ID = '__CRED_CRED';
        $CRED_ACCESS_GROUP_NAME = __( 'Post Forms Front-end Access Group', 'wp-cred' );
        $CRED_ACCESS_GROUP_ID = '__CRED_CRED_GROUP';
        if ( $id == $CRED_ACCESS_AREA_ID ) {
            $groups[] = array(
                'id' => $CRED_ACCESS_GROUP_ID,
                'name' => $CRED_ACCESS_GROUP_NAME
            );
        }
        return $groups;
}
Finally, we register our custom capabilities on each group. Our callback needs to get the already registered capabilities, area id and group id, so we populate the right box inside our custom tab.
// Add our callback
// Mind that we set a priority of 10 and we expect 3 arguments
add_filter( 'types-access-cap', 'register_access_cred_caps', 10, 3 );
// Define our callback
public static function register_access_cred_caps($caps, $area_id, $group_id) {
        $CRED_ACCESS_AREA_ID = '__CRED_CRED';
        $CRED_ACCESS_GROUP_ID = '__CRED_CRED_GROUP';
        $default_role = 'author';
        if (
            $area_id == $CRED_ACCESS_AREA_ID
            && $group_id == $CRED_ACCESS_GROUP_ID
        ) {
            $forms = self::getAllFormsCached();
            foreach ( $forms as $form ) {
                $settings = isset($form->meta) ? maybe_unserialize($form->meta) : false;
// caps for forms that create
                if (
                    $settings
                    && isset($settings->form['type'])
                    && 'new' == $settings->form['type']
                ) {
                    $cred_cap = 'create_posts_with_cred_' . $form->ID;
                    $caps[$cred_cap] = array(
                        'cap_id' => $cred_cap,
                        'title' => sprintf(__('Create Custom Post with CRED Form "%s"', 'wp-cred'), $form->post_title),
                        'default_role' => $default_role
                    );
                } elseif (
                    $settings
                    && isset($settings->form['type'])
                    && 'edit' == $settings->form['type']
                ) {
                    $cred_cap = 'edit_own_posts_with_cred_' . $form->ID;
                    $caps[$cred_cap] = array(
                        'cap_id' => $cred_cap,
                        'title' => sprintf(__('Edit Own Custom Post with CRED Form "%s"', 'wp-cred'), $form->post_title),
                        'default_role' => $default_role
                    );
                    $cred_cap = 'edit_other_posts_with_cred_' . $form->ID;
                    $caps[$cred_cap] = array(
                        'cap_id' => $cred_cap,
                        'title' => sprintf(__('Edit Others Custom Post with CRED Form "%s"', 'wp-cred'), $form->post_title),
                        'default_role' => $default_role
                    );
                }
            }
// these caps do not require a specific form
            $caps['delete_own_posts_with_cred'] = array(
                'cap_id' => 'delete_own_posts_with_cred',
                'title' => __('Delete Own Posts using CRED', 'wp-cred'),
                'default_role' => $default_role
            );
            $caps['delete_other_posts_with_cred'] = array(
                'cap_id' => 'delete_other_posts_with_cred',
                'title' => __('Delete Others Posts using CRED', 'wp-cred'),
                'default_role' => $default_role
            );
        }
        return $caps;
}
Note that this Access hooks API is meant for developers, so do not worry if you did not follow this all.
Troubleshooting
Sometimes, you hook your callback against an action and filter, but nothing happens.
The first thing to do is locate where the hook is being applied. Usually, it means scanning the codebase against the name of the hook. Your IDE should provide a tool for searching inside a whole directory, so that should not be a problem. If you can deal with the command line, tools like grep or ack can help you also.
You can use other tools with a GUI. There are two WordPress plugins that when combined will help you track which callbacks each hook got registered: Debug bar and Debug bar actions and filters addon. Once installed and activated, you will see a new entry on the admin bar. In one of its tabs, you can see all the hooks registered and fired in the current page, and the list of callbacks registered against each of them.
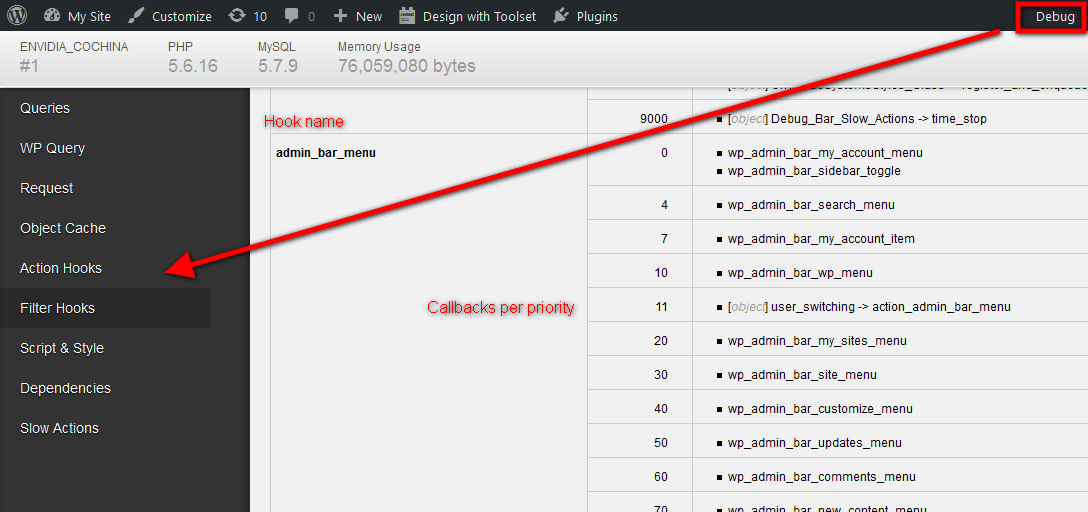
Notice that this information gets collected at the very end of the page. One of the most common problems when dealing with hooks is that you register your callback too late: the hook has already run, so your callback did not make it into the list on time. So, you might see that your callback is properly registered by then, but it is still not being fired.
In that case, you can check whether a given callback has been added to a given hook on time. After finding where an action or filter is being fired, you can see whether your callback has been registered already or not by using two handy WordPress functions: has_action and has_filter.
// Check whether the callback my_callback_function has been registered on the my_action action
// Will be FALSE if the callback is not registered, and the priority in case it is
$is_registered = has_action( 'my_action', 'my_callback_function' );
How to get help – Toolset support
Still not sure about one of the hooks, or need some polishing with an action? Please use our forum of Toolset support expert to get help; we are there to help 5 days a week and 20 hours a day.
Note that we will give you all the necessary guidelines with hooks and actions, and we’ll look at your code and provide advice, but we cannot produce custom code solutions for you.
When you need custom coding, which extends Toolset functionality, we recommend contacting one of Toolset certified consultants.