Sometimes, you need to extend your site with custom features not available in Toolset. Toolset allows you to easily add custom PHP code to your site without editing any theme files. This makes the code you add independent of the theme you use.
Benefits of adding custom code using Toolset
Using Toolset to add custom code to your site brings some important benefits:
- Your custom code is separate from your theme. Updating or switching a theme will not impact your custom code. Also, there is no need to create a child theme just to add custom code.
- No need to edit the PHP files in your site to add custom code, you do it from the WordPress admin.
- Easily enable or disable your custom code by using the backend interface.
- Easily select where your code is run. This can be on the front-end, on the backend, or inside AJAX calls.
- Execution of your custom code is automatically checked by Toolset. Toolset will catch any major issues with your custom code. For example, it can prevent a fatal error caused by your code, simply by not executing it if an issue is detected.
Before you start
If you are only getting familiar with PHP at this point, we prepared two pages to get you started writing custom code with Toolset:
You might also be interested in our Programmer Reference.
Adding custom PHP code using Toolset
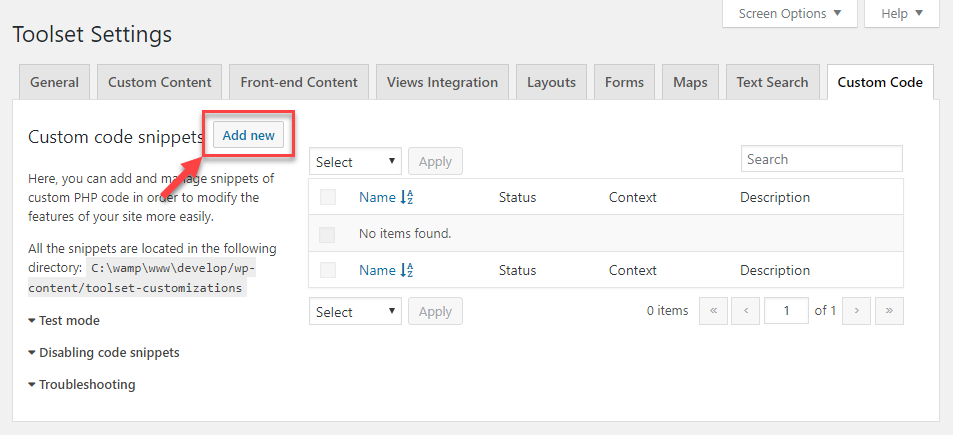
To add custom PHP code to your site, go to the Toolset -> Settings page and click the Custom Code tab.
This page lists all the code snippets you add and allows you to edit and manage them.
To add a code snippet, click the Add new button, type in the name (slug) and click Create.
Your snippet is created and listed on the page. Now, you can click on its name to edit its options and add code to it.
Activating a code snippet
For a snippet to be executed as intended, you must do the following:
- Activate it by clicking Activate link below its name on the list of snippets.
- Make sure to select the right context for the snippet. This means choosing where to run it: on the front-end, WordPress admin (back-end), or inside AJAX calls.
To save performance, choose only the contexts where the snippet is actually needed. - If the snippet is in the On demand mode, there must be a GET (or POST) parameter with the snippet slug, i.e. http://develop.loc?toolset-run-code-snippet=my-cool-snippet.php.
Snippet execution timing
Snippets are executed quite early during the init action, with priority 20. This means that all Toolset post types are registered and things like the public m2m API are available by then.
If you need your code to be executed later, you can add the actions and filters in the snippet code as you see fit. However, executing earlier than init:20 is not possible.
Testing and troubleshooting
Using custom code can lead to unexpected issues and errors. Here are some basic testing and troubleshooting tips.
Recovering from errors
To activate the test mode, add the following line to your site’s wp-config.php file:
define( 'TOOLSET_CODE_SNIPPETS_TEST_MODE', true );
When this mode is active, you can temporarily disable code snippets by adding a special URL parameter, i.e. http://mysite.tld?toolset-disable-code-snippets=1.
Error logging
If a snippet code produces an error, a log is stored from the last execution attempt. This log is shown when editing the snippet.
Specifically, a snippet is considered to have errors if it does any of the following:
- throws an exception or a throwable object
- produces a notice, a warning or an error
- returns a falsy value
- produces non-empty output (for example via “echo”)
You can use the error_log() function to write to your server log or a log file set by the WP_DEBUG_LOG constant. This will not be seen as a problem with the snippet.
Security
Creating code snippet means that there will be a new directory with executable PHP files, and it must be secured against possible exploitations. That can be achieved by implementing these two measures:
First, create an empty index.php file in the snippet directory (wp-content/toolset-customizations/). That will prevent anyone to list the directory’s contents even if the file permissions on the server aren’t set correctly. Toolset creates this file automatically, but if you decide to manually create any subdirectories, make sure that you also copy the empty index.php file into them.
Second, it is necessary to protect individual scripts against direct execution, in case someone guesses their exact URL. It is highly suggested to add this line before any other code in each snippet:
toolset_snippet_security_check() or die( 'Direct access is not allowed' );
If Toolset doesn’t detect this line at the beginning of the file, a warning message will be displayed in the snippet listing.
Disabling the code snippets feature
Sometimes, you might want to disable this feature, or parts of it.
To entirely disable the code snippet support, adding the following line your wp-config.php file:
define( 'TOOLSET_DISABLE_CODE_SNIPPETS', true );
To keep the code snippet support but hide the Custom Code tab from the Settings page, add the following line to your wp-config.php file:
define( 'TOOLSET_DISABLE_CODE_SNIPPETS_GUI', true );
Finally, we respect the WordPress’ native DISALLOW_FILE_EDIT and DISALLOW_FILE_MODS constants. If any of them is set to true, it will not be possible to edit code snippet files through the Toolset interface but only directly on the server.