Layouts comes with a library of cells, including Views and Forms, that allow the development of new functionality without PHP. However, you are not limited to the cells that Layouts developers have created. You can use the Layouts Cell API to create your own Custom Cells. The cells API provides a method to create a Layouts-based theme with custom functionality, powered by Layouts’ drag-and-drop engine.
We will explain how to use the cell API with a Google Maps cell example.
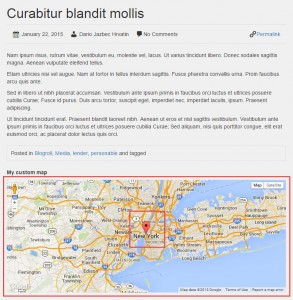
Assume that your theme must allow the insertion of a Google Map with a marker on a coordinate. A page with a Google Map cell could look like this:
Google Map Custom Cell on the front-end
This is an example of the code required to display this map with the coordinates obtained from the custom fields:
<div id="js-map-element"
data-marker-lat="<?php echo get_post_meta($post->ID, "map_lat", true); ?>"
	data-marker-lon="<?php echo get_post_meta($post->ID, "map_lon", true); ?>"
	data-general-zoom="<?php echo get_post_meta($post->ID, "map_zoom", true); ?>"
	data-map-type="<?php echo get_post_meta($post->ID, "map_type", true); ?>"
	style="height: "<?php echo get_post_meta($post->ID, map_height", true); ?>"px">
</div>
The challenge is to create a new Layouts cell that:
- Allows the user to enter the location, zoom, map-type, and height;
- Displays the Google Map with these inputs.
The cell API allows you to define Custom Cells, add storage to cells, set up the cell-options GUI, and render the HTML for the cell in the front-end.
Where to save the PHP files that define the Custom Cells
To begin, you must create a directory called “dd-layouts-cell” in your theme’s folder:
../wp-content/themes/YOUR_THEME_NAME/dd-layouts-cells/.
The Layouts plugin expects this directory in your theme and will load the cell definition PHP files from this location.
If the Custom Cell requires additional files such as JavaScript or images, these should be placed in separate folders inside the “dd-layouts-cell” folder. For example:
../wp-content/themes/YOUR_THEME_NAME/dd-layouts-cells/js/,
../wp-content/themes/YOUR_THEME_NAME/dd-layouts-cells/images/.
In addition to placing the custom cell file in dd-layouts-cell directory following code has to be added to functions.php file of the active theme.:
if ( defined('WPDDL_VERSION') && !function_exists('include_ddl_layouts')) {

    function include_ddl_layouts( $tpls_dir = '' ) {
        $dir_str = dirname( __FILE__ ) . $tpls_dir;
        $dir     = opendir( $dir_str );

        while ( ( $currentFile = readdir( $dir ) ) !== false ) {
            if ( is_file($dir_str . $currentFile) ) {
                $info = pathinfo($dir_str . $currentFile);
                /**
                 * http://php.net/manual/en/function.pathinfo.php#refsect1-function.pathinfo-returnvalues
                 * It will only return 'extension' if the file has an extension
                 */
                if (isset($info['extension'])) {

                    /**
                     * This file has extension, validate
                     * Only allows PHP files.
                     */

                    $the_extension= $info['extension'];
                    if( 'php' === $the_extension  ){
                        include $dir_str . $currentFile;
                    }
                }
            }
        }
        closedir( $dir );
    }

    include_ddl_layouts( '/dd-layouts-cells/' );
}
Defining the Custom Cell’s options
When the files have been created, you must define the Custom Cell. In this example, the following code is used:
function register_google_maps_cell_init() {
		if( function_exists('register_dd_layout_cell_type') ) {
			register_dd_layout_cell_type('google-maps-cell',
				array(
					'name'						=> __('Google Maps cell', 'wpbootstrap'),
					'icon-css'					=> 'icon-map-marker',
					'description'				=> __('Plots the Google Map from coordinates or location name search result.', 'wpbootstrap'),
					'category'					=> __('Example cells', 'wpbootstrap'),
					'category-icon-css'			=> 'icon-sun',
					'button-text'				=> __('Assign Google Maps cell', 'wpbootstrap'),
					'dialog-title-create'		=> __('Create a new Google Maps cell', 'wpbootstrap'),
					'dialog-title-edit'			=> __('Edit Google Maps cell', 'wpbootstrap'),
					'dialog-template-callback'	=> 'google_map_cell_dialog_template_callback',
					'cell-content-callback'		=> 'google_map_cell_content_callback',
					'cell-template-callback'	=> 'google_map_cell_template_callback',
					'preview-image-url'			=> get_template_directory_uri() . '/dd-layouts-cells/images/layouts-google-maps-cell.jpg',
					'register-scripts'			=> array(
						array( 'google_maps_geocoder_js', get_template_directory_uri() . '/dd-layouts-cells/js/ddl-google-maps-geocoder.js', array('jquery'), WPDDL_VERSION, true ),
						array( 'google_maps_cell_js', 'https://maps.googleapis.com/maps/api/js?v=3.exp&sensor=false', array('jquery'), WPDDL_VERSION, false )
					)
				)
			);
		}
	}
	add_action( 'init', 'register_google_maps_cell_init' );
This code registers a new Custom Cell for Layouts. The name of the cell, its description, and other cell options are set. The Cell API document explains these options in detail.
Please note that the two scripts registered using register-scripts will only be loaded on the WordPress admin. These scripts are required for the cell’s “settings” screen. If scripts must be loaded in the front-end, they can either be added to the theme or added to the cell’s front-end render callback function (see Section 5).
Designing the cell’s settings screen in Layouts editor
When users insert your cell into the Layouts editor, a settings screen should display requesting the values required by the cell. The Cell API allows us to design this settings screen using HTML and minimal PHP.
The function google_map_cell_dialog_template_callback() implements the cell’s settings screen and registers the storage required for the cell.
When the_ddl_name_attr() function is called, two things occur:
- The storage for the field value is created;
- The HTML input for the field is displayed in the cell’s settings page.
// Callback function that returns the user interface for the cell dialog.
function google_map_cell_dialog_template_callback() {
ob_start();
?>

<h3>
	<?php the_ddl_cell_info('name'); ?>
</h3>

<ul class="ddl-form" id="js-ddl-map-form">
	<li style="position:relative;">
		<div class="ddl-form-item">
			<label for="js-address"><?php _e( 'Address', 'wpbootstrap' ) ?>:</label>
			<input id="js-address" type="text">
			<div class="ddl-form-button-wrap" />
				<button class="button button-secondary js-ddl-geocode" value="Geocode"><?php _e( 'Get coordinates', 'wpbootstrap' ) ?></button>
			</div>
		</div>

		<div class="ddl-form-item ddl-dialog-gmap-container" style="float: right;">
			<div id="js-map-canvas" style="height: 200px; width: 564px;"></div>
	</div>
		<p>
			<label for="<?php the_ddl_name_attr('marker_pos'); ?>"><?php _e( 'Coordinates', 'wpbootstrap' ) ?>:</label>
		<input type="text" id="js-coord" name="<?php the_ddl_name_attr('marker_pos'); ?>">
	</p>
</li>
<li>
		<label for="<?php the_ddl_name_attr('data_marker_lat'); ?>"><?php _e( 'Latitude', 'wpbootstrap' ) ?>:</label>
		<input type="text" id="js-latitude" name="<?php the_ddl_name_attr('data_marker_lat'); ?>">
	</li>
	<li>
		<label for="<?php the_ddl_name_attr('data_marker_lon'); ?>"><?php _e( 'Longitude', 'wpbootstrap' ) ?>:</label>
		<input type="text" id="js-longitude" name="<?php the_ddl_name_attr('data_marker_lon'); ?>">
	</li>
	<li>
		<label for="<?php the_ddl_name_attr('map_zoom'); ?>"><?php _e( 'Zoom level', 'wpbootstrap' ) ?>:</label>
		<input type="number" name="<?php the_ddl_name_attr('map_zoom'); ?>" value="14">
	</li>
	<li>
		<label for="<?php the_ddl_name_attr('map_height'); ?>"><?php _e( 'Map height', 'wpbootstrap' ) ?>:</label>
		<input type="number" name="<?php the_ddl_name_attr('map_height'); ?>" value="300">
	</li>
	<li>
		<label for="<?php the_ddl_name_attr('map_type'); ?>"><?php _e( 'Map type', 'wpbootstrap' ) ?>:</label>
		<select name="<?php the_ddl_name_attr('map_type'); ?>">
			<option value="ROADMAP"><?php _e( 'road - default map type', 'wpbootstrap' ) ?></option>
			<option value="SATELLITE"><?php _e( 'satellite - Google Earth images', 'wpbootstrap' ) ?></option>
			<option value="HYBRID"><?php _e( 'hybrid - a mixture of normal and satellite views', 'wpbootstrap' ) ?></option>
			<option value="TERRAIN"><?php _e( 'terrain - a physical map based on terrain information', 'wpbootstrap' ) ?></option>
		</select>
	</li>
</ul>

<?php
return ob_get_clean();
}
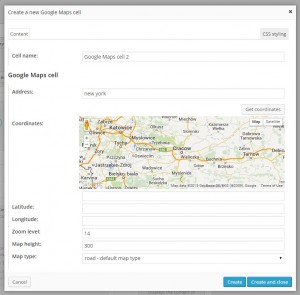
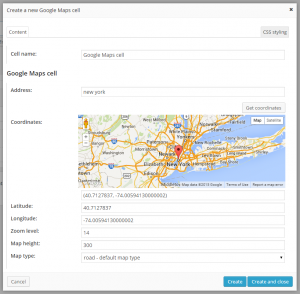
In the original PHP code, custom fields were used for the location and other settings of the Google Map. In the Layouts example, the_ddl_name_attr() function is used to create the storage for the map’s information.
The following is the cell settings dialog:
Defining the cell preview in the layout editor
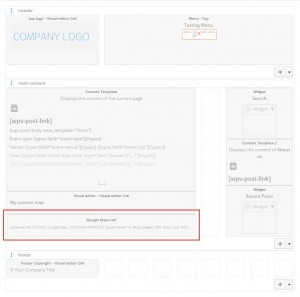
In the next step, the appearance of the cell in the layout editor is defined. In the cell’s preview, we display the saved options for the map, such as latitude and longitude:
// Callback function for displaying the cell in the editor.
function google_map_cell_template_callback() {
ob_start();

	?> <div class="cell-content">
		<p class="cell-name">{{ name }}</p>
		<# if( content.data_marker_lat && content.data_marker_lon ){ #>

		<div class="cell-preview">
			<#
			var preview_string = '<b>Latitude:</b> ' + content.data_marker_lat + ', <b>Longitude:</b> ' + content.data_marker_lon;
			preview_string += ', <b>Zoom level:</b> ' + content.map_zoom + ', <b>Map height:</b> ' + content.map_height + ', Map type: '+ content.map_type;

			preview = DDL_Helper.sanitizeHelper.stringToDom( preview_string );
			print( DDL_Helper.sanitizeHelper.transform_caption_shortcode(preview.innerHTML) );
			#>
		</div>
		<# } #>


            </div>
       <?php
	return ob_get_clean();
This is the resulting Custom Cell in the layout editor:
Displaying the cell on the site’s front-end
In the final step, the output of the cell on the site’s front-end is defined. In this example, a DIV with the Google Map is displayed.
The google_map_cell_content_callback() function determines the output of this cell on the front-end:
// Callback function for display the cell in the front end.
	function google_map_cell_content_callback() {
		// Enqueue Google Maps API
		wp_enqueue_script ( 'google_maps_cell_remote_js', 'https://maps.googleapis.com/maps/api/js?v=3.exp&sensor=false', array('jquery'), WPDDL_VERSION, true );
		// Enqueue Google Maps script that loads the map
		wp_enqueue_script ('google_maps_cell_js', get_template_directory_uri() . '/dd-layouts-cells/js/google-maps-cell.js', array('jquery'), WPDDL_VERSION, true);

		ob_start();
		?>

		<div id="js-map-element"
			data-marker-address="<?php the_ddl_field('data_marker_address'); ?>"
			data-marker-lat="<?php the_ddl_field('data_marker_lat'); ?>"
			data-marker-lon="<?php the_ddl_field('data_marker_lon'); ?>"
			data-general-zoom="<?php the_ddl_field('map_zoom'); ?>"
			data-map-type="<?php the_ddl_field('map_type'); ?>"
			style="height: <?php the_ddl_field('map_height'); ?>px">
		</div>

		<?php
		return ob_get_clean();
	}
Note that to begin, two scripts that must be loaded on the front-end are enqueued. The first is the Google Map API loaded from the Google library. The second is the custom JavaScipt code that obtains the saved map options and uses them to create the map on the front-end.
jQuery( document ).ready(function($) {

	// This is JavaScript that creates the actual map on the front-end, using the data passed through “data-?? parameters
	if ( $("#js-map-element").length !== 0 ) {

		var $mapElement = $("#js-map-element");
		var address = $mapElement.data('address');
		var mapLat = $mapElement.data('marker-lat');
		var mapLon = $mapElement.data('marker-lon');
		var myLatlng = new google.maps.LatLng(mapLat, mapLon);
		var mapType = $mapElement.data('map-type');
		var mapZoom = parseInt ( $mapElement.data('general-zoom'), 10 );

		function initializeMap() {

			var mapOptions = {
				zoom: mapZoom,
				center: myLatlng,
				mapTypeId: google.maps.MapTypeId[mapType]
			};

			var map = new google.maps.Map($mapElement[0], mapOptions);

			var marker = new google.maps.Marker({
				position: myLatlng,
				map: map,
				title: address
			});
		}

		google.maps.event.addDomListener(window, 'load', initializeMap);
	}

});
In the code, after enqueuing the two scripts, the actual markup that will be rendered on the front-end is added.
That’s it! The Custom Cell for displaying the Google Map is complete. Now that your theme’s custom functionality is a cell, a user need only insert the cell into a layout and drag-and-drop the cell to the appropriate location. For example:


