Skip Navigation

[Resolved] Let visitor choose the view’s items within time scope

This thread is resolved. Here is a description of the problem and solution.

Problem: I would like to create a system where the User can generate a report showing posts of some kind, i.e. items. The User can choose a post published date range for the items, and can also specify which custom fields should appear in the report (the same fields displayed for all items in the report). Items are related to another post type patient in a one-to-many relationship...one patient, many items. So in the Report builder I would like the User to be able to select a patient, and only items related to that patient would appear in the results.

Solution: It's a complex setup that uses a new post Form and a View filtered by shortcode attributes. Details follow below.

Relevant Documentation:
https://toolset.com/documentation/user-guides/passing-arguments-to-views/
https://toolset.com/documentation/user-guides/views/filtering-views-query-by-date/

This support ticket is created 5 years, 1 month ago. There's a good chance that you are reading advice that it now obsolete.

This is the technical support forum for Toolset - a suite of plugins for developing WordPress sites without writing PHP.

Everyone can read this forum, but only Toolset clients can post in it. Toolset support works 6 days per week, 19 hours per day.

Sun Mon Tue Wed Thu Fri Sat
8:00 – 12:00 8:00 – 12:00 8:00 – 12:00 8:00 – 12:00 8:00 – 12:00 - -
13:00 – 17:00 13:00 – 17:00 13:00 – 17:00 13:00 – 17:00 13:00 – 17:00 - -

Supporter timezone: America/New_York (GMT-04:00)

Author
Posts
#1402807

I'm trying to create a "report" (= view of custom posts) with couple of features that are beyond my skills:
1. visitor should be able to set time limit of the report by post publish date: visitor gives start and end dates and the view shows all the posts published between those dates.
2. visitor should be able to choose what things (=custom fields of the custom post) are in the report. So she/he clicks the items, and they appear in the list.

Are these only beyond my skills or also Toolset's capabilities? All the hints how to proceed are greatly appreciated.

#1403481
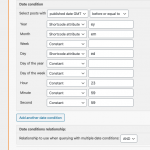
condition1.png
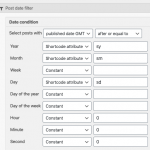
condition2.png

Hello, yes I think this can be accomplished with Types, Views and Forms but it's fairly complex. I'd say this requires advanced-level knowledge of Types and Views, but basic-level knowledge of Forms. Here is the general idea:
- Create a custom post type or types which will be included in these reports. I'll call these "Items" but the name is arbitrary.
- Create all the different custom fields to store custom values for each Item.
- Create a new custom post type called "Reports" or something similar.
- In the Reports custom post type, add two custom date fields: Start Date and End Date.
- For each custom field in the original custom post type, create a custom checkbox field in the Reports custom post type. This checkbox will determine whether or not to display the corresponding field from the original post. So for example, let's say you have an email field in the Item post type called "Contact Email". In the Reports post type, you will have a checkbox field called "Show Contact Email" or something similar.
- Now, create a new Form using Toolset > Post Forms. This Form should create new Report posts. Set the Form to "Display the post" after the Form is submitted.
- Create a View of Items. For testing purposes, do not add any Query Filters yet.
- Use the Loop Wizard to finish designing the output for the results. For testing purposes, include all the custom fields from the Item post, as well as the post date and post title.
- Create a Content Template for Report posts, and insert the View of Items in the Content Template for Reports.
- Create one Report post in wp-admin, then check the post on the front-end of the site. You should see some Items, if you have already created some. All the fields should be displayed. It doesn't have to look perfect now, this is just for testing to see if the View is finding results.
- Edit the View. In the Query Filter section, add one post date filter with two conditions. If you cannot see the Query Filter panel, scroll to the top right corner of the page and click "Screen Options" to activate the Query Filter panel.
- The first date filter condition should be set to "published date GMT", "after or equal to", then define shortcode attributes to set the Year, Month and Day fields. In my example, attributes are "sy" (Start Year), "sm" (Start Month), and "sd" (Start Day). Use constants for Hour (0), Minute (0), and Seconds (0). See condition1.png.
- The second date filter condition should be set to "published date GMT", "before or equal to", then define shortcode attributes to set the Year, Month and Day fields. Mine are "ey" (End Year), "em" (End Month), "ed" (End day). Use constants for Hour (23), Minute(59), and Seconds(59). See condition2.png.
- Edit the Content Template for Reports. Use the Types field shortcode to set the corresponding shortcode attribute values for the start/end years, start/end months, and start/end days. The format will look something like this:

[wpv-view name="items-in-a-report" sy="[types field='report-start-date' style='text' format='Y'][/types]" sm="[types field='report-start-date' style='text' format='m'][/types]" sd="[types field='report-start-date' style='text' format='d'][/types]" ey="[types field='report-end-date' style='text' format='Y'][/types]" em="[types field='report-end-date' style='text' format='m'][/types]" ed="[types field='report-end-date' style='text' format='d'][/types]"]

- Edit the View of Items to insert conditional HTML that will either show or hide the Item field based on the corresponding Report custom field. Note the use of the "item" attribute and "$current_page" operator in the Types field shortcode.

[wpv-post-title]
[wpv-post-date]
[wpv-conditional if="( '[types field='show-item-select-1' item='$current_page'][/types]' eq '1' )"][types field="item-select-1"][/types][/wpv-conditional]
[wpv-conditional if="( '[types field='show-item-single-line-1' item='$current_page'][/types]' eq '1' )"][types field="item-single-line-1"][/types][/wpv-conditional]
[wpv-conditional if="( '[types field='show-item-number-1' item='$current_page'][/types]' eq '1' )"][types field="item-number-1"][/types][/wpv-conditional]
[wpv-conditional if="( '[types field='show-item-date-1' item='$current_page'][/types]' eq '1' )"][types field="item-date-1"][/types][/wpv-conditional]
#1403807

Hi Christian, I'm amazed, this is so clever!

I forgot to say one very important thing (or actually I thought I could add it myself later, but it seems I can't). The items are related to a parent post, let's call it patient (one patient, multiple items). Now I'm trying to create a patient selector also.

I created a relation to the report and patient (one patient, multiple reports) and now my goal is to show
A. selected items
B. selected date range
C. selected patient

A and B are covered (thanks to you!) but I can't get the C working. I tried to add the relation filter into same view, but I couldn't get any relation filter functioning; either no results or all results. The relation is there, but I can't connect same parent's different post siblings. Or am I approaching this wrong way?

#1404979

Okay I see, you can make a few small changes to integrate a Patient as a filter in the Report:
- Update or rebuild the Create New Report Form, so that the new Patient - Report post relationship field is included. This field may not have existed before when you created the Form, so the system would not have generated it automatically.
- Now when the Report creator submits the Form, they will choose a Patient. This Patient will be the parent of the Report.
- In your View of Items, add a Post Relationship Query Filter and choose the Patient - Item relationship. Configure the filter so that the parent Patient is set by one shortcode attribute patientid.
- Update the shortcode that is used to display the View of Items. Add an attribute patientid, since it was specified in the Query Filter in the previous step.
- Set the value of that attribute to be the ID of the related Patient. You can easily determine that Patient ID on the single Report post because the Patient is the parent of this Report.

[wpv-view name="items-in-a-report" patientid="[wpv-post-id item='@patient-report.parent']" ...and so on...

The actual syntax for the wpv-post-id shortcode item attribute may be different based on your post type slugs and post relationship slugs. If there is any doubt, insert the post ID shortcode somewhere outside the View shortcode, and use the Post Selection tab in the popup window to select the parent Patient post. The system will generate the appropriate syntax with the relationship name, and you can then copy that into the patientid attribute.

Let me know if you have questions about these changes.

#1405143

My issue is resolved now thanks to your genious mind, Christian. Thank you so much!