This is the technical support forum for Toolset - a suite of plugins for developing WordPress sites without writing PHP.
Everyone can read this forum, but only Toolset clients can post in it. Toolset support works 6 days per week, 19 hours per day.
| Sun | Mon | Tue | Wed | Thu | Fri | Sat |
|---|---|---|---|---|---|---|
| - | 9:00 – 13:00 | 9:00 – 13:00 | 9:00 – 13:00 | 9:00 – 13:00 | 9:00 – 13:00 | - |
| - | 14:00 – 18:00 | 14:00 – 18:00 | 14:00 – 18:00 | 14:00 – 18:00 | 14:00 – 18:00 | - |
Supporter timezone: Asia/Karachi (GMT+05:00)
Related documentation:
This topic contains 11 replies, has 2 voices.
Last updated by danC-5 1 year, 9 months ago.
Assisted by: Waqar.
Tell us what you are trying to do?
I'm working on a site for a client who is going to manage several different users with their own project associated through Taxonomies. What I'm trying to setup is so that using the View/Block editor I can auto cycle through the data and return it all to the page but ONLY have the content containing the Taxonomy associated with their user be visible to them when on the front end and not display other information.
Is there any documentation that you are following?
I haven't found any documentation as of yet. I was hoping there would be a short code I could write or if there is a setting I can enable to have it so only certain users can see certain items displayed on the page.
Is there a similar example that we can see?
Not that I have found.
What is the link to your site?
witz.cheramycreative.com
Hi,
Thank you for contacting us and I'd be happy to assist.
To restrict the display of the post results in views, based on a custom taxonomy attached to the current user, you'll need some custom code.
Here are the steps that I'll recommend:
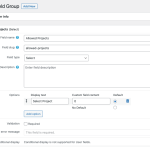
1. You'll first need a select type custom user field "Allowed Project".
( example screenshot: select-user-field.png )
Note that this field will only have one default option in the field's settings and the rest of the options will be generated from a custom taxonomy, programmatically.
2. Next, you'll add a custom taxonomy "Projects" and attach it to your post type, which you'd like to control the user access to.
3. To populate the "Allowed Project" user field's options from this new "Projects" taxonomy's terms, you'll need a custom function attached to the "wpt_field_options" filter:
https://toolset.com/documentation/programmer-reference/types-api-filters/#wpt_field_options
Example:
add_filter( 'wpt_field_options', 'func_to_dynamically_allowed_projects', 10, 3);
function func_to_dynamically_allowed_projects( $options, $title, $type ){
	switch( $title ){
		case 'Allowed Projects':

			$args = array('hide_empty' => 'false');
			$terms = get_terms( array('project'), $args );

			foreach ($terms as $term) {
				$options[] = array(
					'#value' => $term->slug,
					'#title' => $term->name
				);
			}

		break;
	}
	return $options;
}
The above code snippet can be included through either Toolset's custom code feature ( ref: https://toolset.com/documentation/adding-custom-code/using-toolset-to-add-custom-code/ ) or through the active theme's "functions.php" file.
As a result, all available terms in the "Projects" taxonomy, will be included as options in the "Allowed Project" user field. When a project will be saved in this custom user field, the selected term's 'slug' will be saved as a custom field's value.
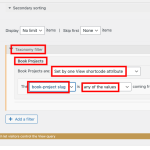
4. In the view, where you'd like to only show the posts attached to the project taxonomy term linked to the currently logged-in user, you can include a taxonomy query filter and set it to show only posts linked to the taxonomy term whose 'slug' is passed through the shortcode attribute.
( example screenshot: taxonomy-query-filter-example.png )
5. The last step would be to pass the current user's selected term slug value in the shortcode for the view, using the types fields API shortcode ( [types usermeta='allowed-projects' output='raw' user_current='true'][/types], ref: https://toolset.com/documentation/customizing-sites-using-php/functions/ ).
For example:
[wpv-view name="views-to-show-the-posts" wpvbookproject="[types usermeta='allowed-projects' output='raw' user_current='true'][/types]"]
This way, the view will only return those posts, where the attached taxonomy term is the same as the one saved in the current user's user field "Allowed Project".
I hope this helps and please let me know if you need any further assistance around this.
regards,
Waqar
Hi there, I'm going through the setup right now and I have one follow up question. Is there a way to have my Admin users be able to see multiple projects? I tried changing the Select view to a Radio and it only allowed me to choose one option. I tried changing it to Checkbox and it didn't auto populate like the previous two options. Is there something I need to setup to have my admin be allowed visibility on all of the projects without making a seperat Project Taxonomy for Admin? I really want to avoid that as I have the Taxonomy tag on the front end for project categories and such and don't want it to say Admin on every post.
I believe I have resolved my previous question. I built a conditional setup and passed in the user's Role to see if it's equal to Administrator or not then simply didn't filter through Taxonomy and another one for if it Isn't Administrator to display the view that is filtered.
I do however have another question on step 5. Where do I put that shortcode to allow me to enter wpvproject into the shortcode attribute of the Taxonomy filter? Is it in the function.php file or somewhere else?
Thanks for writing back and good thinking on using the conditional setup for the admins.
The last step (step 5) refers to showing the view on the desired page/content template. Wherever you need to show the view, you'll call it using its shortcode "wpv-view" in your content:
https://toolset.com/documentation/programmer-reference/views/views-shortcodes/#wpv-view
For example:
[wpv-view name="views-to-show-the-posts" wpvbookproject="[types usermeta='allowed-projects' output='raw' user_current='true'][/types]"]
1. views-to-show-the-posts: You'll replace it with the actual name/slug of your target view.
2. wpvbookproject: You'll replace it with the actual shortcode attribute name that you've set in the view's taxonomy filter.
3. allowed-projects: You'll replace it with the actual slug of the user field that you've set for storing the user's allowed project.
I hope this makes it more clear.
I think I understand, but just to be sure:
Once I have the setup created through Step 4 I can remove the view from the page and simply call it back through the short code via a Paragraph element, is that correct?
And then again because I'm using this similar setup on multiple changes for different users access levels to use this again the only thing needed to change would be the name of the wpv-view to the new view for that specific page, correct?
Your understanding is correct and for different pages, you'll just have to change the view's name/slug in the shortcode.
For adding the view's shortcode, I'd recommend using the "Fields and Text" block/element and not the "Paragraph" block/element.
( the paragraph block/element is suitable for simple text output )
Thanks for the clarification.
I know this may sound like a dumb follow up but I did what you recommended and changed the Paragraph elements to Fields and Text but it auto changed the short code to something different and now no longer renders correctly. Is there a step I'm missing on using this element compared to the Paragraph one?
Can you please make sure that you've used the "HTML" mode and not the "Visual" mode while adding the shortcode in the "Fields and Text" block?
( example screenshot: hidden link )
In case the issue persists, please share a screenshot of how the shortcode was added in the back end and how it is showing on the front end. You can also share the link to an example page with this views shortcode.
Thank you, again I knew I was missing something.
However another issue has come up now. For some reason anytime I have an image or a slider gallery in the template, if I run it through this short code every image scales up to the entire page. This is causing issues now because my column setup is being thrown off. The images are going off the canvas and I can't even scroll side to side to see them and the gallery images don't even render on the page. Has anyone had a similar issue in the past using this technique and having their images throw everything off?
I can view all other templates fine and the sorting issue works perfectly, but it's causing this visual error which makes 1 of my pages almost unusable.
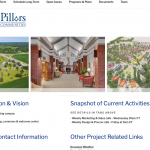
Image 1 is what the normal page looks like with the template not sorting through the short code. The other one is what it renders out as when it is. And it's just the images, the text blocks and everything else works just fine.
New threads created by Waqar and linked to this one are listed below:
https://toolset.com/forums/topic/split-gallery-images-losing-size-and-styles/
Thanks for the update and glad that this is sorted now.
I've created a separate ticket for your question about the gallery slider images and will follow up on that shortly.
( ref: https://toolset.com/forums/topic/split-gallery-images-losing-size-and-styles/ )
You're welcome to mark this ticket as resolved and start a new one, for each new question or concern.
My issue is resolved now. Thank you!


