This is the technical support forum for Toolset - a suite of plugins for developing WordPress sites without writing PHP.
Everyone can read this forum, but only Toolset clients can post in it. Toolset support works 6 days per week, 19 hours per day.
| Sun | Mon | Tue | Wed | Thu | Fri | Sat |
|---|---|---|---|---|---|---|
| - | 7:00 – 14:00 | 7:00 – 14:00 | 7:00 – 14:00 | 7:00 – 14:00 | 7:00 – 14:00 | - |
| - | 15:00 – 16:00 | 15:00 – 16:00 | 15:00 – 16:00 | 15:00 – 16:00 | 15:00 – 16:00 | - |
Supporter timezone: Europe/London (GMT+00:00)
This topic contains 15 replies, has 3 voices.
Last updated by Nigel 4 years, 5 months ago.
Assisted by: Nigel.
Transfer this ticket to Nigel.
Hi Nigel,
For hidden link we would like to change the background image of the container with a google maps image automatically created based on the property address.
Here's an example: hidden link?
Can you elaborate step-by-step how to set this up?
Thanks!
You don't respond to my question HOW EXACTLY we can change the background image of the container for hidden link with this google satelite image being generated based on the property address.
Nigel is taking all of our threats in the absense of Waqar who is on vacation.
The Google Satellite map background image is provided by Google, there isn't such kind of feature to change it within Toolset plugins, you can submit a feature request for it:
https://toolset.com/home/contact-us/suggest-a-new-feature-for-toolset/
Our developers will evaluate it.
Transfer the ticket to Nigel.
Nigel
Languages: English (English ) Spanish (Español )
Timezone: Europe/London (GMT+00:00)
Luo is correct, it's not possible to make the background of a container the satellite "image" from a Google map.
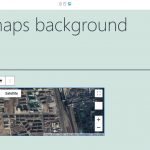
In the link you shared, that's not what it is either, it's an actual interactive Google map, not a container with a background image.
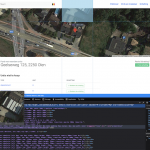
As you may be able to see in the attached screenshot, such a map is inserted by the Google API as an iframe, and buried deep within the iframe the "image" is actually a grid of divs containing individual image tiles that make up the whole.
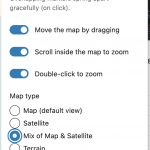
You can do the same as in your linked example, though, which is to simply insert an actual map, with satellite view (actually a Mix of Map and Satellite if it is going to include road names etc., see screenshot).
Hi Nigel,
That makes sense but the question remains how we can actually insert the satelite map within the view loop instead of the background image?
Nigel
Languages: English (English ) Spanish (Español )
Timezone: Europe/London (GMT+00:00)
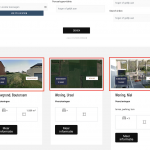
You mean you want to replace the images marked in the screenshot with satellite maps instead?
If you insert a map with the Toolset Maps block it will be a fully interactive map, and I don't think it is advisable to load so many map instances on the same page, for performance reasons, but also billing reasons, it will affect your Google API usage loading maps where they are not necessarily needed (because the results include places that the user is not interested in).
I would suggest only including such a map in the template for individual posts.
You mean you want to replace the images marked in the screenshot with satellite maps instead?
>> Correct. Please refer to the Toolset template to see how the background image is setup.
We would like to have it setup once in the template so that it is applied to all individual posts automatically.
Obviously it cannot impact our site performance and billing.
Can you elaborate step-by-step the setup? Please attach screenshots/video if needed.
Nigel
Languages: English (English ) Spanish (Español )
Timezone: Europe/London (GMT+00:00)
Turning to the template for single property posts, a Container block is used with a background image provided by dynamic sources coming from an image field.
But you can't do the same with an actual Google map inserted using its Maps API via an iframe in the same way, because it isn't an image.
You could add a Map block to insert a map, but it would be an interactive map, not an image, so it can't be a background, it will be a foreground element taking up space in the content flow.
There is a way that you could add a Google map as an image rather than as an interactive map, and it is possible to make it a background image.
But, there is a big but.
You can no longer use Blocks for whatever would be inside the container that the map is the background for, you would need to craft and style everything manually, the HTML and the CSS.
I can give you advice about how to add an HTML block that has a div which uses a static image of a Google map as a background, but you will need to style it and any content you want to appear inside that container div—including sizing and layout.
If you are willing to do that then I can describe what is required, otherwise you can simply insert a Map block to add an interactive map to the property listing pages.
I assume the map block cannot be integrated in the view loop so that it is shown in the current content flow?
If not, the second option is the only valuable one but we don't know how to style, size, ...
Therfore, can you give a complete HTML block that would replace the current content flow and that not only will include the Google map as a background but also the styling, layout and content as-is now?
Nigel
Languages: English (English ) Spanish (Español )
Timezone: Europe/London (GMT+00:00)
We seem to be talking at cross purposes here, I'm not sure if you are trying to add a map to the View output on the property search page, or whether you want to add a map to the single property template.
Anyway, let me review the options, and then we can move forward.
Firstly, setting a map as a background is not going to be an option for you, in any scenario (unless you recruit a developer to do it for you). It requires good knowledge of HTML and CSS, and you say you cannot do that yourself, and we cannot do it for you.
So a map as a background image is ruled out.
If you want to add a map to each of the results in the output of your View, as I noted above, I would advise against inserting a normal map because of the implications for performance and cost of the API usage. ("Obviously it cannot impact our site performance and billing" - it would impact both, unavoidably: adding features has implications.) Using the block editor alone it is not possible anyway (the View block doesn't let you insert a Map block in its output), although there is a workaround using legacy shortcodes, but I advise against implementing it.
That refers to "normal" interactive maps.
As I hinted above, you could add a static map image to the output of the View for each result (this would be an img element, not a background image), and if you want to use this option I can describe how to do it.
On the single property posts, again, there is no option available to add a map as a background image.
You can insert a normal interactive map using the Map block (where the marker location comes from the address field for the current property post).
Or you could simply use a static map image. Again, I can describe how to do that.
If you want to use static map images in either scenario let me know and I'll share details of how to do that.
We want to replace the images marked in the screenshot (which you've sent above) with satellite maps instead, both for the property search page and single property template.
You can share the details for the possible scenarios.
Nigel
Languages: English (English ) Spanish (Español )
Timezone: Europe/London (GMT+00:00)
On the single property page, I expect that you may want a fully interactive map, and for that you simply add a Map block and for the marker in the settings in the sidebar specify Dynamic Source for the marker, choosing the appropriate address custom field.
To add a static image to the loop items of your View, the first thing you need to do is to check your Google API key to ensure that it can be used for the Maps Static API.
You can see details of the Maps Static API here: hidden link
And it should be possible to update your API key to include the Maps Static API here: hidden link
You can test that it is working by just pasting in this example from the Google documentation into your browser, although you will need to update the API key with your key:
<em><u>hidden link</u></em>
&markers=color:blue%7Clabel:S%7C40.702147,-74.015794&markers=color:green%7Clabel:G%7C40.711614,-74.012318
&markers=color:red%7Clabel:C%7C40.718217,-73.998284
&key=YOUR_API_KEY
When you have confirmed that you have it working, make a note of the slug of the address field for your property post type (I think on your site it is "adres", that's what I'll use in the example below).
While editing the View, in the output section insert a Custom HTML block where you would like the image to appear.
We are going to add an img tag, and set the src to be a URL like the maps.googleapis.com example above, except we'll need to provide the location dynamically, which we'll do using a shortcode.
So you would add the following to the Custom HTML block:
<img class="image-cover" src="<em><u>hidden link</u></em> field='adres' format='FIELD_LATITUDE,FIELD_LONGITUDE'][/types]&zoom=16&size=800x400&maptype=hybrid&markers=|[types field='adres' format='FIELD_LATITUDE,FIELD_LONGITUDE'][/types]
&key=YOUR_API_KEY">

<style type="text/css">
.image-cover {
  object-fit: cover;
  height: 400px;
}
</style>
Several things to note.
First, you need to provide your API key.
Second, there are several parameters provided that you may want to modify, for example the initial zoom level, and the image size (specified in pixels).
Lastly I included a little CSS, which includes the image height that should match that provided in the URL parameters.
The purpose of this is to prevent the image shrinking when the screen narrows and the available space for the image is less than its width. Instead of shrinking the image to maintain its aspect ratio (making it more difficult to read any text on the image), the height is kept constant and the visible part of the image is reduced (the edges disappear). I think that is better for usability, but you are welcome to change it of course.
If you didn't want to include a full interactive map on the property listing page and only wanted to include a static map image there too then you can use the same technique instead of adding a Map block.
We want to add a "fully interactive map" to the "loop items of our view" (as I tried to explain several times before).


