The messaging system is simple, yet elegant and can be a good base for your own project. It’s built entirely with Toolset so you can easily modify and extend its functionalities. It provides users with an immediate way to chat with contractors in a seamless conversation.
If you want to learn more about its features check out our introduction to Toolset’s communication system.
The messaging system is built upon a single custom post type. The messages are added with Toolset Forms and displayed with Views and a Content Template.
Required Toolset plugins
- Toolset Types
- Toolset Blocks – After activating the Toolset Blocks plugin, you have to enable the legacy version of the Views editor
- Toolset Access
- Toolset Forms
- Toolset Module Manager – To download the Toolset Module Manager plugin, go to your Toolset account’s Downloads page and click the Legacy Plugins tab
Please note that the Toolset Module Manager plugin is not being actively developed anymore. We do still support it and keep it available because some Toolset users still use it and find it useful.
When you have all the plugins in place start by importing Toolset Messaging Module using the main Toolset Export/Import menu.
Custom post type and fields
The custom post type is called Messages and has four additional custom fields on top of the default title and body. These fields store information on the recipient, sender, page from which the conversation was started and details of the first message which enables threaded messages.
Fields/Usage
Title – message title*
Post body – message body*
Message to – user ID of a recipient*
Message from – user ID of a sender*
First message ID – ID of the first message. This field is used for threading messages.**
Contractor ID – ID of the page from which a first message was sent from.**
* This value is added when forms are submitted
** This value is copied between messages whenever a new message is added to the same thread
Views
There are three views for messages received (Inbox), messages sent (Outbox) and one for displaying related messages.
Messages received
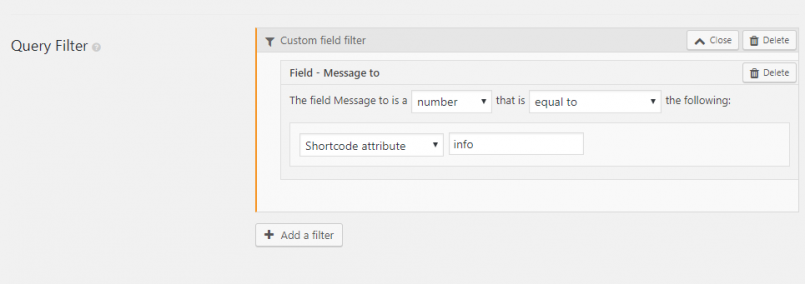
This view queries messages with Query Filter which uses shortcode value (the info attribute passes the current user ID information to the view) and compares it to a custom field “Message to”. This way the view displays only messages which are sent to the currently logged in user.
This is done with a shortcode with an info attribute:
[wpv-view name="Messages received" info="[wpv-current-user info='id']"]
We want to show this view only to logged in users. For this, Toolset Access shortcode comes in handy distinguishing guests from logged in users.
[toolset_access role="Guest" operator="allow"]
Here we display information for guests
[/toolset_access]

[toolset_access role="Guest" operator="deny"]
Holds the actual view:
[wpv-view name="Messages received" info="[wpv-current-user info='id']"]
[/toolset_access]
Messages sent
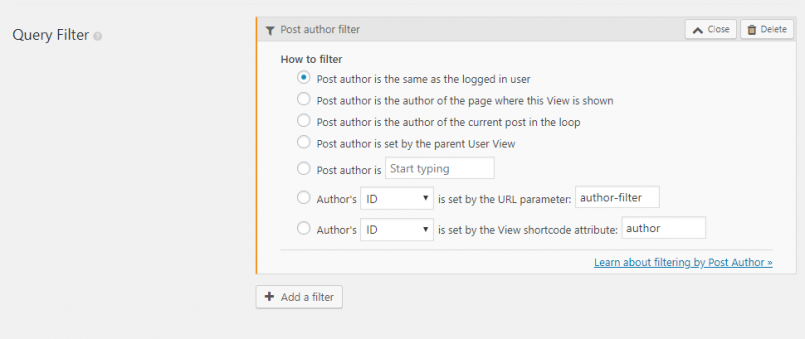
This view displays your outbox which is essentially your own posts. In a view, we use Query Filter where the post author is the same as the currently logged in user.
Related messages
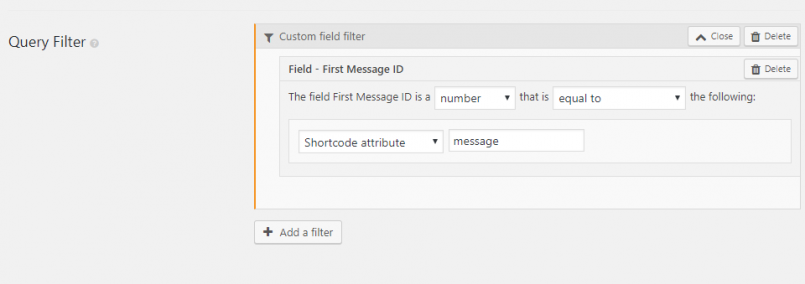
This view displays all the messages where the value of the custom field First Message ID is the same as the currently viewed message. This information is passed to the view using parameter message which holds the above mentioned First Message ID.
[wpv-view name="Related messages" message="[types field='first-message-id' raw='true'][/types]"]
This view displays all related messages and is a part of the Message – single item content template.
Forms
There are two forms. One is used for sending the first message and the other one for replies. Forms are accessible for logged in users only and will publish content right after it is submitted. Each submission triggers a notification which is sent to the recipient.
New message form
The form contains fields for title and body (message). By default, when you add a post content field to the form it has a rich editor which allows you to insert HTML elements. What we wanted was a plain text input.
To do this we used a cred_generic_field shortcode to render post content field as a plain text area.
[cred_generic_field field='post_content' type='textarea' value='' urlparam='' output='bootstrap']
{
"required":1,
"validate_format":0,
"persist":0,
"default":""
}
[/cred_generic_field]
Besides that, there are hidden fields also added with the cred_generic_field shortcode:
Contractor ID – holds [wpv-post-id] shortcode
Message from – current user ID added with [wpv-current-user info=’id’]
Message to – post author ID (the form is added to the contractor page, so when submitted it grabs the data from contractor profile [wpv-post-author format=’meta’ meta=’ID’]
Example of a generic field populated with shortcode data in the form:
[cred_generic_field field='wpcf-message-to' type='hidden' class='' urlparam='']
{
"required":0,
"validate_format":0,
"persist":1,
"generic_type":"user_id",
"default":"[wpv-post-author format='meta' meta='ID']"
}
[/cred_generic_field]
Another field which we mentioned earlier is First message ID. This is the ID of the post (message) created with this form. In order to grab that data, we use CRED hook, allowing us to capture the ID of the just created post. The code is added to function.php file in the main theme’s folder:
add_action( 'cred_save_data_2119471', 'set_post_id_in_field', 10, 2 );
function set_post_id_in_field( $post_id, $form_data ) {
	update_post_meta( $post_id, 'wpcf-first-message-id', $post_id );


	$content = get_post_field('post_content', $post_id);
	$content = str_replace('[','{{',$content);
	$content = str_replace(']','}}',$content);
	$my_post = array(
		'ID'           => $post_id,
		'post_content' => $content,
	);
// Update the post into the database
	wp_update_post( $my_post );
}
Where 2119471 is the ID of the form and needs to be adjusted accordingly.
Reply message form
For post title, we wanted to achieve something like “Re: Post title” so it’s easy to see that the message is a part of a larger conversation. This is done using the value parameter:
[cred_field field='post_title' post='message' value='Re: [wpv-post-title]' urlparam='' class='form-control' output='bootstrap']
Next, it was necessary to figure out who is adding the reply message so the message can be delivered properly. To answer that question, a conditional statement was used:
If the Message from field is different from the currently logged in user, then Message to should be equal to the Message from field. And the opposite is true. If the Message from is equal to the currently logged in used field than Message to should be equal Message to value.
This sounds a bit complicated. Fortunately, following the code is much easier:
[wpv-conditional if="( $(wpcf-message-from) ne '[wpv-current-user info="id"]' )"]
[cred_generic_field field='wpcf-message-to' type='hidden' class='' urlparam='']
{
"required":0,
"validate_format":0,
"persist":1,
"generic_type":"user_id",
"default":""
}
[/cred_generic_field]
[/wpv-conditional]

[wpv-conditional if="( $(wpcf-message-from) eq '[wpv-current-user info="id"]' )"]
[cred_generic_field field='wpcf-message-to' type='hidden' class='' urlparam='']
{
"required":0,
"validate_format":0,
"persist":1,
"generic_type":"user_id",
"default":"[types field='message-to' output='raw'][/types]"
}
[/cred_generic_field]
[/wpv-conditional]
Message from – current user id [wpv-current-user info=’id’]
Contractor ID & First Message ID values are copied from the currently viewed message
Setup
First, you need to download the Messaging System module and import to your site with Module Manager. Next, you need to create two pages (inbox and outbox) and add respective views to them:
Inbox
[toolset_access role="Guest" operator="allow"]
Message for guests
[/toolset_access]
[toolset_access role="Guest" operator="deny"]
[wpv-view name="Messages received" info="[wpv-current-user info='id']"]
[/toolset_access]
Outbox
[toolset_access role="Guest" operator="allow"]
Message for guests
[/toolset_access]
[toolset_access role="Guest" operator="deny"]
[wpv-view name="Messages sent"]
[/toolset_access]
Form Hooks & query post process filter
The First message ID field stores the ID of the post (message) created with this form. In order to grab that data we are using CRED hook. You need to add this code snippet to the function.php file in your main theme’s folder:
add_action( 'cred_save_data_2119471', 'set_post_id_in_field', 10, 2 );
function set_post_id_in_field( $post_id, $form_data ) {
	update_post_meta( $post_id, 'wpcf-first-message-id', $post_id );


	$content = get_post_field('post_content', $post_id);
	$content = str_replace('[','{{',$content);
	$content = str_replace(']','}}',$content);
	$my_post = array(
		'ID'           => $post_id,
		'post_content' => $content,
	);
// Update the post into the database
	wp_update_post( $my_post );
}
This function also sanitizes shortcodes which could be added to the message. You will need to change the ID of the New message form to the ID of the form on your site. The screenshot below shows you where you can find the current name – in this case, it is 2119471.
We also have a similar function for preventing the rendering of shortcodes in the reply form. 2119691 is the ID of the Reply message form.
add_action( 'cred_save_data_2119691', 'remove_shortcodes_from_message', 10, 2 );
function remove_shortcodes_from_message( $post_id, $form_data ) {

	$content = get_post_field('post_content', $post_id);
	$content = str_replace('[','{{',$content);
	$content = str_replace(']','}}',$content);
	$my_post = array(
		'ID'           => $post_id,
		'post_content' => $content,
	);
// Update the post into the database
	wp_update_post( $my_post );
}
The inbox and outbox should display only the latest message in the thread. In order to achieve this, a wpv_filter_query_post_process filter is used along with a function which picks the latest post for each message thread.
add_filter( 'wpv_filter_query_post_process', 'contractors_messages_list_filter', 10, 3 );
function contractors_messages_list_filter( $query, $view_settings, $view_id ) {
	if ( $view_id == '2119478' || $view_id == '2119475' ) {
		$threadIDs = [];
		$queryFiltered = [];

		foreach ( $query->posts as $post ) {
			$threadID = get_post_meta( $post->ID, 'wpcf-first-message-id', true );


			if ( !in_array( $threadID, $threadIDs ) ) {
				$threadIDs[] = $threadID;
				$queryFiltered[] = $post;
			}
		}
		$query->posts = $queryFiltered;
		$query->found_posts = count( $queryFiltered );
		$query->post_count = count( $queryFiltered );
	}
	return $query;
}
Where 2119478 and 2119475 are the ID of the Messages sent and Messages received Views and you need to adjust them to.
Snippet for an author archive
Now you need to add a link to the new message form. In our example, for simplicity, we use a user’s profile page (user archive) to display their posts and contact form to avoid adding another custom post type.
This type of archive requires us to grab an author ID with a custom shortcode. You need to add this code snippet to the function.php file in your main theme’s folder:
function get_author_id_in_archive_func($atts) {
$author_id = 0;
if (is_author()){
$author = get_queried_object();
$author_id = $author->ID;
}
return $author_id;
}
add_shortcode("get_author_id_in_archive", "get_author_id_in_archive_func");
Next, go to Toolset > Settings > Frontend content and add “get_author_id_in_archive” in the “Third-party shortcode arguments” input field.
That’s all. Your custom messaging system is ready to use.


