Home
» Blog
» Case studies » How to use Types and Views parent-child relationship feature to build a multi-level slider: Case study of a government site.
User experience is a very important factor in the development of a website. A clean user experience ensures visitors easy access to the contents of your site and also simplifies content management.
Today, Zach Swinehart discusses Types and Views plugins and their parent-child relationship feature. Zach shares with you how he uses these plugins to build a smart, interactive questionnaire that is easily editable by a non-technical staff.
The project, larimerworkforce.org, is a large website for the Larimer County Workforce Center, a department of the Larimer County government in Colorado.
The Larimer County Workforce Center provides access to employment and training services.
Project requirement
The main projects requirements are:
To build a site that provides a clean UX. The site should cater to the needs of different audiences without overwhelming visitors.
To improve ease of management. To make the site easily editable by non-technical staff.
Idea and solution
The home page contains an interactive questionnaire. After the user fills out the questionnaire, the site routes the visitor to a page that best fits their needs. This questionnaire was implemented as a slider using Types, Views and an existing Carousel Template of Bootstrap.
The challenge
To make the questionnaire easily editable by non-technical staff. This was achieved by using Types and Views and their support parent-child relationships.
About the author
Zach Swinehart
Zach Swinehart is a web designer/developer based in Colorado, USA. Zach prioritizes a great user experience for both the end-user and the client who is administering the site.
Zach is a self-taught web expert, as is evident from his online portfolio at zachswinehart.com. Today’s case study proves that being passionate about what you’re doing is the roadmap to success.
Stay with us to see how passion and creativity can help you to provide the best user experience for sites, even for serious customers such as government institutions.
Preliminary work on the project
Mapping a user flow to an interactive questionnaire
“Coming into the project, the biggest challenge that I encountered was that there were so many different core audiences using the site – it made it hard to conceptualize a clean user experience where people could easily find what they were looking for without getting overwhelmed. “
Introduce Zach. Then he explains that after quite a bit of strategizing with the client, they were able to map a user flow path that they could wrap into an interactive questionnaire for the home page. Zach was really excited with the auto guide concept:
This idea sounded great. It would allow people to answer a few questions and be routed to where they needed to go!
Making the website easily editable by non-technical staff
Wrapping the interactive homepage questionnaire into a slider didn’t seem too difficult for Zach. However, the client wanted to allow their administrator to update content. Here’s where things got a little difficult. The administrator is not a technical person, and to make the content easily editable, Zach had to simplify the appearance of the site’s backend.
Zach was already familiar with Types and Views plugins. He was aware that by using these two plugins, he could save a lot of time and also provide the content administrator with an interface that was easy to use.
Zach also realized that by adapting the parent-child relationship feature of the Types plugin, he could make the content administration even more simple. This strengthened his belief that the Types and Views plugins were the best solution.
The final effect
Now let’s see how Zach managed to meet the customer’s requirements and provide a clean user experience site for the front-end and back-end users of the website.
At first glance, it doesn’t look like a typical slider at all. You can see a board-like object providing you with a list of options to choose from. The slider won’t slide until you make your choice. This is more like an invitation to interact, which makes it different from a typical slider, and that was the point!
Depending on what you click, you will:
Either get another slide with a new subset of options to choose, or
Land on a specific static page
So, a clever combination of an interactive survey with an attractive slider! The site presents itself with nice background images, together with soft transitions between the slides, all of which make for a great user experience. Pretty cool indeed!
Is it possible to implement the slider in your WordPress admin?
Now you probably wonder how you would implement the slider in your beloved WordPress. The more you play with the slider and think about the possible technical solutions, the trickier the process seems to be.
But don’t worry! In a few minutes you will say “That’s smart! Unbelievable!” and you’ll be eager to shake hands with this guy in the hat, and call him your hero.
Diving into the implementation: How it was done with Toolset
Before we dig into technical details, let’s try to work out the basic concepts behind the slider.
Identifying basic objects
Let’s get back to the magic slider again. And consider this scenario:
On the first slide, you choose ‘Veterans’.
On the next slide, you choose ‘I am interested in special services for Veterans’, and you land on a static page.
So, on your route, you visited 2 Survey Slides (with nice background pictures):
‘First Slide’
‘Veterans’ slide
See pictures below
First SlideVeterans Slide
You also clicked 2 Survey Options (buttons):
‘Veterans’
‘I am interested in special services for Veterans’
See pictures below
‘Veterans’ option‘I am interested in special services for Veterans’ option
You have probably also noticed that each slide, in addition to its description, provides an individual set of options associated:
Each slide has an individual set of options associatedEach slide has an individual set of options associated
You may also have noticed that the option that you choose will decide what comes up next: another slide or a static page.
With that having been said, we can define a few terms:
Definitions
Survey Slide from a visitor’s point of view is a board that slides and has a title (yet optional), description, breadcrumbs (optional), attractive background picture, and a set of clickable options associated.
Survey Option, from a visitor’s point of view, is a clickable button associated with an individual slide that has its title, and can link to another slide or to a static page.
Now, the process of mapping these basic objects into WordPress structures seems pretty obvious.
WordPress Structures implemented with Types
Zach used the Types plugin to create 2 Custom Post Types and 2 groups of Custom Fields:
Two Custom Post Types were created to store Survey Slides and Options, respectively (see picture below)
a. Home Survey Slide
b. Home Survey Options,
He used Custom Fields to store additional values for slides and options. Custom fields were also associated with each particular group of fields of previously defined Custom Post Types.
To make things even simpler, Home Survey Slider custom post type became a parent of Home Survey Options (Types plugin feature).
Note: We’ll soon discuss the parent-child relationship feature in more detail.
What they look like in your WordPress dashboard
Now let’s see what this looks like, from a content administrator point of view.
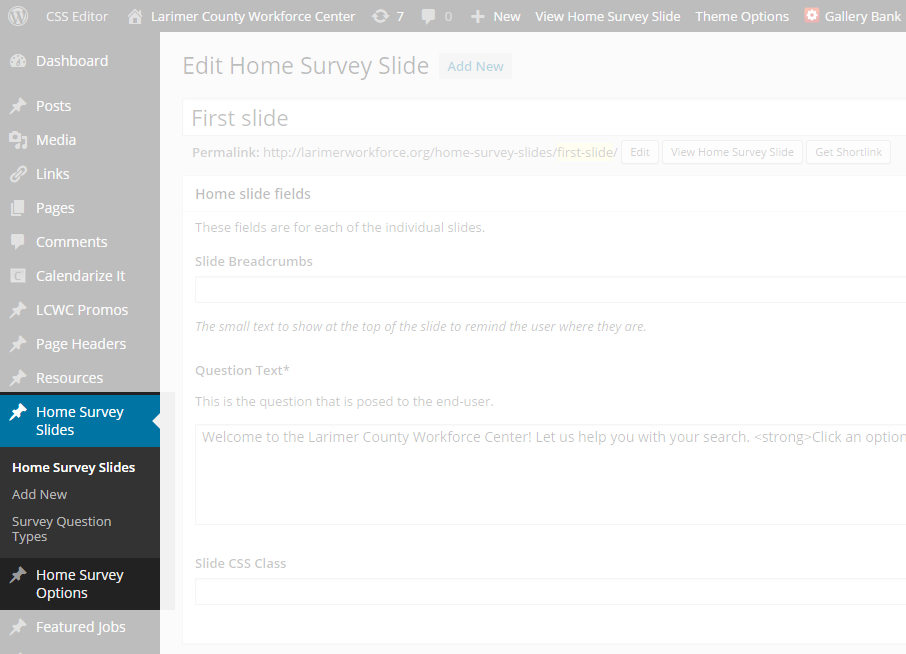
If an end-user wants to add a new slide, he or she can just add a new custom post of Home Survey Slides:
To manage slides back-end user uses Home Survey Slides CPT, to manage options they use Home Survey Options CPTSlides are stored as custom posts which make them easy to manage
To store slide additional information, Zach used Custom Fields:
Edit screen of Veterans slide, an instance of Home Survey Slide CPT (upper part)
Zach made the Home Survey Slides a parent post for the Home Survey Option custom post type.
The use of the parent-child relationship feature provides the following benefits:
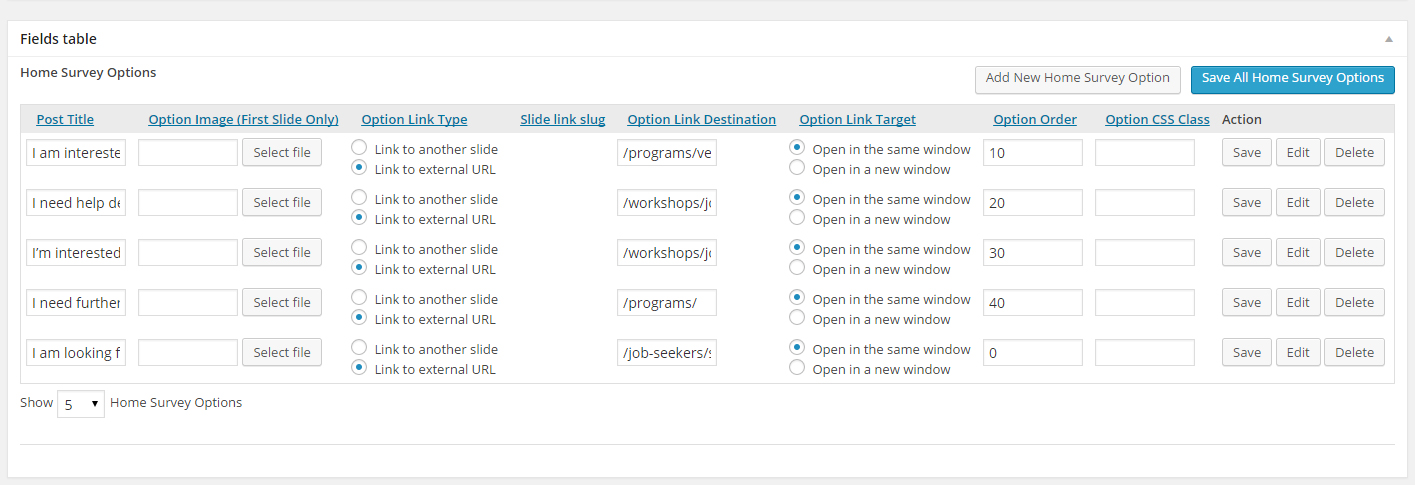
If you edit a single Home Survey Slide, you can manage all the options available for this slide (see figure below)
When you display a single slide, you can easily display all options belonging to it (more on that in Views section)
If you scroll down the Edit screen for a single Home Survey Slide, you will see all its child posts, which are the Home Survey Options.
Home Survey Options. Edit screen of Veterans slide, an instance of Home Survey Slide CPT (bottom part)
All of the options were designed to be very simple and straight-forward for end users to edit with minimal training. If they want this button to link to a page, they can just choose the appropriate radio button option and type in the URL of the page. If they want it to link to another slide, they can just choose that radio button option and type the slug of that slide.
Let’s face the slider now!
What is a slider? From a visitor’s point of view, a slider is just a sequence of rotating images driven by right/left arrow-like controls. Often, a slider may also include so-called pagination, which is a list of clickable items that allow you to jump to a specific slide.
Can you just take any of the existing, ready–to use JavaScript sliders available on the Internet, and adapt it to your needs? Zach’s case proves that this is doable.
Zach used the Bootstrap carousel. Here’s a Bootstrap demo page demonstrating how it works with default options.
How about adapting Bootstrap carousel framework to implement our slider?
There are also tons of YouTube video tutorials that provide step-by-step guidance on using the Bootstrap markup.
Adapting the Bootstrap Carousel to your needs
Let’s see how our needs differ from those that are suited to a standard slider, and how we can adapt the Bootstrap Carousel to our needs. The following features on Zach’s website are different from the Bootstrap Carousel:
No prev/next controls. In Zach’s site there are no right/left arrows to switch the sides forward/backward. That’s even simpler! No need to include the prev/next controls at all.
Slide transitions. In Zach’s case, the transitions between the slides are controlled by a set of clickable options. It’s similar to a standard slider pagination, but here, the set of available options needs to be set independently for each slide. You can use the Bootstrap Carousel ‘Indicators’ section to do this, but instead of setting the data-slide-to attributes incrementally, you need to set the data-slide-to index individually. This is based on the value your content administrator put in a single Slider Option post, in the ‘Slide link slug’ input field (compare picture ‘Home Survey Options’ above)
Action on click.
Additionally, by clicking on a slide option/button, you may end up at another slide (associated with this particular option), or you may leave the slide and land on a specific page. Though we will need to output the destination action conditionally, this is still doable.
High time to show some output: the Views plugin comes into play
Now our task is to output the desired HTML – a Bootstrap Carousel markup with some custom modifications, combined with WordPress stored contents.
For this, we will use the Views plugin. Views allows you to query your custom posts easily, and to build your custom HTML output without touching php source files.
Slide Options View
Views lets you encapsulate a part of your output into separate chunks. You can then bring these chunks into play when needed, like ready-to-use building blocks.
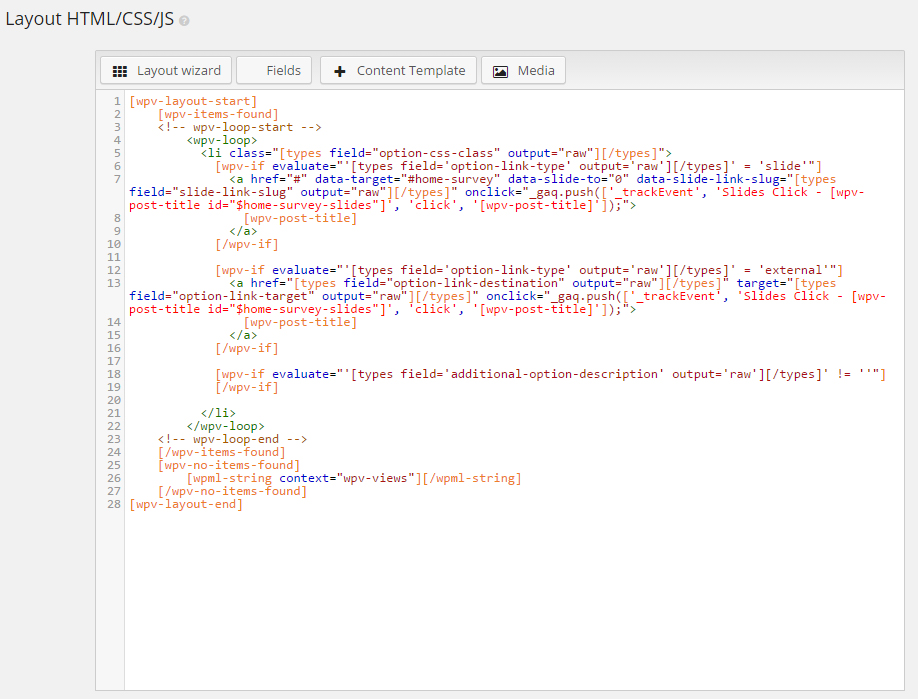
Zach separated the list of clickable options and wrapped it into a View called ‘Slide Options’
Part 1: Filter the posts by the parent view
This step enables the slide view to only get options that belong to it, rather than just a random list of options.
Filter the posts by the parent view
Part 2: The view itself
This View will be responsible for outputting only the set of options for a single slide (see dotted area on the slide below)
‘Survey Slide Options’ View, a view responsible for outputting set of option‘Survey Slide Options’ View (dotted area) – a front-end and final HTML perspective
There are a few things going on here. First off, we have the logic to see if the button is pointing to a URL or to another slide, because that affects the HTML markup. If it’s linking to another slide, Zach has the HTML data attributes set, so that he can transition the Bootstrap carousel to the appropriate slide.
You’ll see that Zach also has the custom onclick events there to tie it in with Google Analytics event tracking. The URL-linking version is basically the same, but without the data attributes for the Bootstrap carousel.
View rendering slides
Now let’s see how a single slide looks like from behind the scenes.
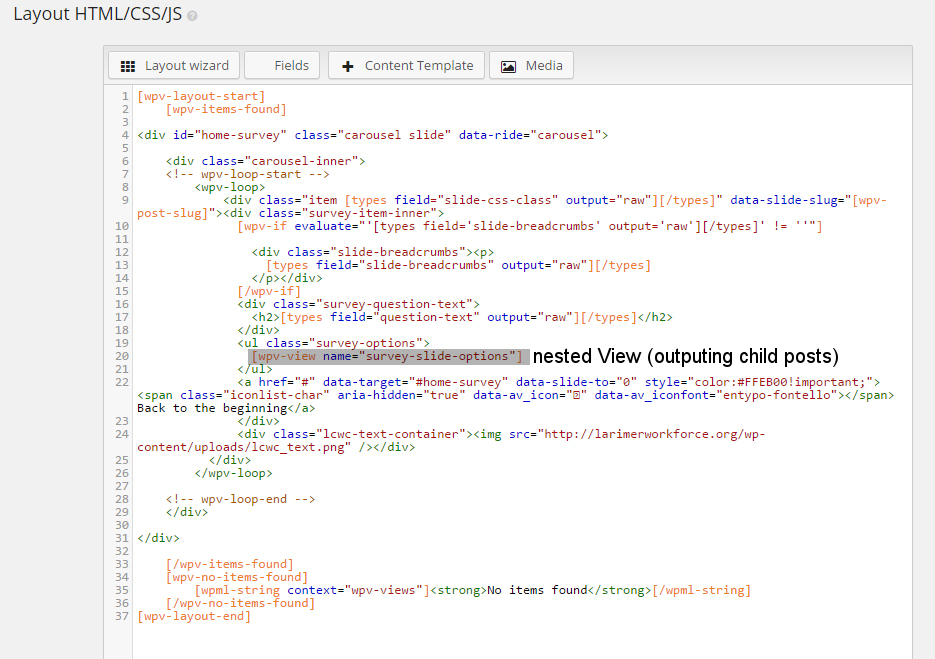
Part 1: The view code
Zach explains:
Survey Slides View, a view responsible for outputting a single slide. It calls a previously defined View (Survey slide options) thanks to parent-post Views feature
The view itself really isn’t that complex. It’s basically just standard Bootstrap carousel markup with a little bit of “Zach Awesomeness” applied. (Patent pending*) You can see that on the slide’s wrapping div tag, he has the slug data attribute (data-slide-to), where he is outputting the slide’s WordPress slug using Types.
That’s how I am able to target it from the slide options. There’s also the “restart questionnaire” link code here so that people can easily get back to slide 1, no matter where they are in the survey. And then of course, we have the nested view where we output the buttons.
* I totally don’t actually have a patent pending on the term “Zach Awesomeness.” But I probably should.
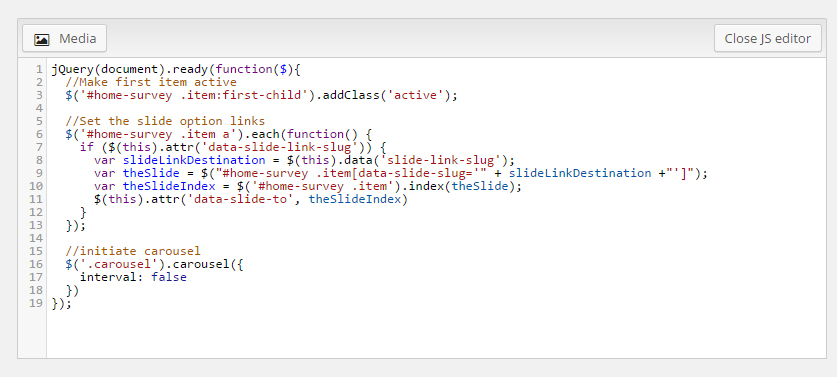
Part 2: Some special JavaScript for the slider
Some jQuery code to make the content admin’s life even easier: the data-slide-to attribute default index with was replaced an index calculated on the basis of a slide slug
By default, the Bootstrap carousel only lets you link to other slides using their index ID. Obviously, that’s not very practical for Zach to have his non-technical client find, and it’s also prone to change if they ever add more slides. So what he did here is wrote some code that looks for a slide that has a slug whenever one of the buttons links to one, and then finds that slide’s ID and replaces the button’s destination slide index number to that value. Pretty cool, right?
In Conclusion
Zach managed to attain his customer’s goal, and by using the Types and Views plugins, he created a clean user experience site for front-end and back-end users. In a nutshell, here’s how Toolset plugins helped him. He used:
The Types plugin to define Custom Post Types to manage slides and slide options.
The Types plugin to create Custom Fields for storing additional information for slides such as breadcrumbs, description etc.
The Types plugin parent-child feature to simplify the end-user experience, and edit related constants from within the same place.
The Views plugin to reduce development time of advanced database queries, including queries parent-child posts and with no line of php code.
The Bootstrap Carousel template to handle the slider.
Zach summarizes:
Zach Swinehart
So there you have it. Using these two great plugins, I was able to build something pretty darn fancy. Obviously, I wouldn’t have been able to build this without my knowledge of JavaScript, but what this example illustrates is the power of these two plugins together.I saved myself lots of time as compared to writing all of this advanced querying and output in php, and was able to put together a fantastic end result that’s super-easy for my non-technical client to use. I hope this example has been helpful for you – if you’re looking for help setting up some fancy stuff using these two great plugins, don’t hesitate to get in touch with me at zachswinehart.com! Zach Swinehart
Did you like the final effect of Zach’s work? Is clean user experience also important to you when working on your customers’ projects? How have the Types and Views plugins helped you to meet your customer requirements? Share your impressions in comments or submit your case study.
User experience is a very important factor in the development of a website. A clean user experience ensures visitors easy access to the contents of your site and also simplifies content management. Today, Zach Swinehart discusses Types and Views plugins and their parent-child relationship feature. Zach shares with you how he uses these plugins to…
Very nice job Zach. I face a similar problem routing our users to where they need to go to. We have a network of destination portals and have three user types – Poeple living or who want to live in the destination, people visiting on holiday and business owners who want to use the site for advertising. Your solution has inspired me for a future design of the site which will make it easy for the three segments to navigate the site without getting lost. Really nice job!
Really like these non-trivial case studies, great work!