Skip Navigation

[Resolved] Sorting posts by custom date input

This support ticket is created 4 years, 8 months ago. There's a good chance that you are reading advice that it now obsolete.

This is the technical support forum for Toolset - a suite of plugins for developing WordPress sites without writing PHP.

Everyone can read this forum, but only Toolset clients can post in it. Toolset support works 6 days per week, 19 hours per day.

Sun Mon Tue Wed Thu Fri Sat
- 7:00 – 14:00 7:00 – 14:00 7:00 – 14:00 7:00 – 14:00 7:00 – 14:00 -
- 15:00 – 16:00 15:00 – 16:00 15:00 – 16:00 15:00 – 16:00 15:00 – 16:00 -

Supporter timezone: Europe/London (GMT+00:00)

This topic contains 8 replies, has 2 voices.

Last updated by SteBlood 4 years, 7 months ago.

Assisted by: Nigel.

Author
Posts
#1639517

Tell us what you are trying to do?
I will have a custom date field which is called 'Max sell date' (date in the future)

I want to show 3 maps.
Map 1 will show all posts which are 30-days prior to the Max sell date, above this I will have a title 'up to 30 days'
Map 2 will show all posts that have 7-14 days prior to the Max sell date, above this will have a title '7-14 days'
Map 3 will show all posts that have 0-7 days prior to the Max sell date, above this will have a title 'imminent'

Basically, I would like to Show the posts in my loop together as 1 post type, but seperate them based on a filter for each map.

This would mean, that a post that shows on map 2. If that post drops below 7 days, it would move automatically from map 2 to map 3.

I am struggling with how to filter the dates.

Thank you in advance.

#1639723

Nigel
Supporter

Languages: English (English ) Spanish (Español )

Timezone: Europe/London (GMT+00:00)

Screenshot 2020-05-27 at 11.32.22.png

I don't quite understand what you are aiming for in terms of the set up, whether these are different maps on different pages, different maps on the same page, or... something else.

In any case, the key part is that you will need 3 separate Views to have 3 separate sets of results based upon different date filters.

In each View you will need to add a Query Filter for your custom date field (if you are creating the views with Blocks then make sure you have the outer View block selected and then you should see the Query Filter section in the sidebar settings near the bottom).

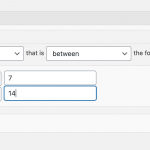
You can see in the screenshot an example of how to add the 7-14 days filter.

The key points to note are that the comparison is as a number (that's how date fields are stored), you use the between operator when applying from-to limits whereas your other view filters will use less than, and see how I use "FUTURE_DAY" to specify x number of days from now.

Is that clear enough?

#1640589

Hi Nigel,

Thank you, sounds like it would work.

The main problem I have is;

I know how to use the block editor to output a map which shows all locations within the view loop.

However, when using the backend view editor(legacy?), I can never seem to be able to get any markers showing on a map, after using the loop wizard.

I've tried using a content template. However, I'd really like to be able to style my pages in elementor, so if that means having to create a view in the legacy? view editor, then I don't mind, again, I don't know how to output my locations onto a map using this editor.

Ideally, I would like to show all 3 maps on 1 page and have 1 view with all results.

I know it would probably be easier for 'you' and really ideal for us, to have 1 map and 1 view, but different coloured markers on the map based on date range as shown above, using FUTURE_DAY.
I don't even know if that is possible.

Thank you for your detailed reply! I really appreciate it!

#1641117

Nigel
Supporter

Languages: English (English ) Spanish (Español )

Timezone: Europe/London (GMT+00:00)

You need 3 Views.

A View queries the database and returns some posts according to the query parameters.

If you want 3 sets of posts from 3 separate date ranges then you need an individual query (and therefore View) for each.

But you can have one map and have each View add its own markers to the same map (and each can have different styled markers).

If you want to make the page in Elementor then yes, you would need to create these Views with the classic editor.

I can talk you through that, but does that set-up I describe sound like what you want?

#1641285

Yes, absolutely, that is exactly the setup I would like.

I think I understand how to use Views correctly and impliment those into my elementor template.

The help I would need is how to set up the map within Views and then the custom map markers.

Thank you again for your patience, Nigel.

#1641503

Nigel
Supporter

Languages: English (English ) Spanish (Español )

Timezone: Europe/London (GMT+00:00)

Screenshot 2020-05-28 at 14.31.54.png

OK, so you'll need to add 3 Views. One of them can add the map and one set of markers. The other two Views will just add more markers to this same map.

So start with the first View, making a new one at Toolset > Views, and choosing to show all results (which just affects which part of the UI you are shown when creating the View).

Don't bother with the Query Filters just yet, I suggest you get the map and markers working on this View and then come back and add the Query Filter.

So to begin with this View will query all posts of the relevant type and output them as markers.

(These are the directions we are following: https://toolset.com/documentation/user-guides/maps/display-on-google-maps/displaying-markers-on-google-maps/#displaying-a-map-with-a-list-of-markers-coming-from-a-view.)

I'm not sure from your question whether your intention is to only show the results as markers on a map, or whether you also intend to output a separate list or grid of results?

If you want to output a grid of results as well as the map then you should use the Loop Wizard to help generate the markup and shortcodes required for that (ignoring the map at the moment). If this is what you want, get that working first and then come back to edit the View when ready.

If you are only showing results on a map then there is no need to use the Loop Wizard.

What is output by the View is determined by the Loop Editor.

Here is what the bare-bones Loop Editor looks like if you didn't use the wizard:

[wpv-layout-start]
	[wpv-items-found]
	<!-- wpv-loop-start -->
		<wpv-loop>
		</wpv-loop>
	<!-- wpv-loop-end -->
	[/wpv-items-found]
	[wpv-no-items-found]
		<strong>[wpml-string context="wpv-views"]No items found[/wpml-string]</strong>
	[/wpv-no-items-found]
[wpv-layout-end]

The key thing to know is that whatever is inside the wpv-loop tags gets output for every post returned by the View query, while outside of these tags things would be output only once.

We only need one map, but we need a marker for every result, so first place the cursor on a newline after the opening wpv-layout-start shortcode and use the Fields and Views button to insert a map (actually a wpv-map-render shortcode).

Then position your cursor between the wpv-loop tags and use the Fields and Views button to insert a marker (actually a wpv-map-marker shortcode).

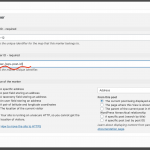
You can see the resulting dialog in the screenshot. Be sure to specify the address source (a custom field), and it is also helpful to add the wpv-post-id shortcode to the marker ID to ensure each generated marker has a unique ID.

So your Loop Editor should now look something like this:

[wpv-layout-start]
[wpv-map-render map_id="map-12"][/wpv-map-render]
	[wpv-items-found]
	<!-- wpv-loop-start -->
		<wpv-loop>
          [wpv-map-marker map_id='map-12' marker_id='marker-[wpv-post-id]' marker_field='wpcf-address'][/wpv-map-marker]
		</wpv-loop>
	<!-- wpv-loop-end -->
	[/wpv-items-found]
	[wpv-no-items-found]
		<strong>[wpml-string context="wpv-views"]No items found[/wpml-string]</strong>
	[/wpv-no-items-found]
[wpv-layout-end]

Yours will be slightly different depending on the settings you choose when inserting the shortcodes.

Note how the map has an ID and the marker specifies the same map_id.

You should be able to test the map is working correctly now by adding the View to a page (directly to some test page, or to an Elementor page using the Toolset Views widget).

Assuming that works, you can make any changes you need to this View, such as adding a Query Filter for a date range.

Then you can create two new Views for the other date ranges. This time you won't need to add the map shortcode to the output, just the marker (making sure that the map_id points to the map from the first View).

Add those two Views to the same page as the first View and all three Views should be adding their markers to the same map.

Do you want to try that?
#1641787

I'll give it a go, thank you!
I never expected you to be as quick and articulate.

Thank you very much, I will let you know how it goes on saturday.

#1643159

Nigel
Supporter

Languages: English (English ) Spanish (Español )

Timezone: Europe/London (GMT+00:00)

Sure, let me know how it goes. Good luck 🙂

#1648555

Apologies Nigel,

I didn't get time to test this, however, I will be testing this in the near future.

If I have any problems implimenting this, I'll reply to this ticket with a new ticket link, so people can follow up if I do run into any problems.

Thank you for your detailed replies and patience!

Thank you!