WordPress allows you to add custom Theme Options to your themes, which users can then set using the native Customizer interface. The process for adding these options to Toolset-based themes is the same and here, we explain how to do this.
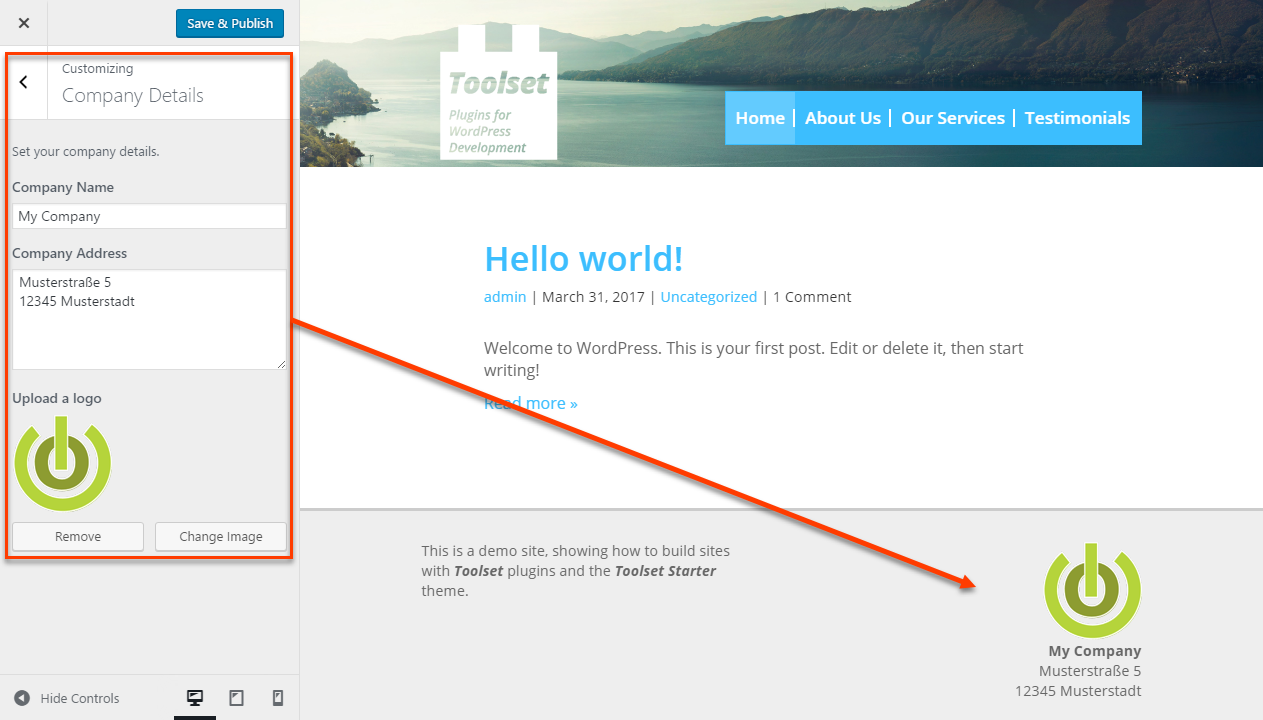
The above image displays an example we will use to add the “Company Details” options to the Customize screen. These options allow entering the basic information about a company, as well as its logo and you can output them anywhere in your theme using a simple shortcode.
To do this, you need to add the appropriate code to your theme’s functions.php file. There are three things this code needs to accomplish:
- Register your custom section for the Appearance -> Customize page.
- Register the custom settings for your section.
- Register the shortcode that will allow you to output your custom options in a theme.
Custom theme options leverage WordPress’ Theme Customization API and we highly recommend visiting the official documentation to learn more about this topic.
Registering your Customizer section
To register your Customizer section, you need to add a custom class that uses the $wp_customize object.
As you can see, you start by initializing your class. You then define your custom section that will appear on the Appearance -> Customize page. For this, you need to define the following options:
- title and description – replace this with your own names and your theme’s textdomain.
- priority – determines where in the Customizer menu the section appears.
- capability – determines the required capability user needs to have to be able to tweak the options.
After setting up the basic options, you need to register all the inputs for the custom Customizer settings, like text fields and the image selector. This part is missing from the above example and is explained in the following section.
Lastly, you register your custom class using the add_action function.
Registering and defining your custom settings
As mentioned above, you need to register all the settings that are to be available for customization and define how users will input their values. In our example, this includes a text field for the company name, a text area for the company address, and an image selector for the company logo.
Let’s see how to register a “Company Name” setting and define its text input field.
Registering custom settings
When registering a new setting, you define its name, whether it is only theme-related (type), the necessary user capability to edit it, and how the setting is updated.
![]() Registering a custom theme setting
Registering a custom theme setting
// Register a new setting "company_name"
        $wp_customize->add_setting( 'company_name', // id of the setting, no need to prefix when using 'theme_mod' as type
            array(
                'default'    => '', // Default setting/value to save
                'type'       => 'theme_mod', // 'theme_mod' or 'option'. [print_theme_settings] only supports theme related settings (theme_mod)
                'capability' => 'edit_theme_options', // Optional. Special permissions for accessing this setting.
                'transport'  => 'refresh', // What triggers a refresh of the setting? 'refresh' or 'postMessage' (instant)?
            )
        );
Defining an input for the custom setting
Now, you need to define the input for the setting you just registered. This is done by defining a new WP_Customize_Control object.
You first define a unique ID for this control’s array of settings and then define those settings:
- label – user interface label for the input. Again, use your own theme’s textdomain as the second argument.
- settings – the ID you used when registering this setting (i.e. “company_name”).
- type – the type of the input field. In this example, using “text” means that “Company Name” is a simple text field. On the other hand, using “textarea” will make your input a multiple-line text area.
- section – the ID of your custom theme settings section, under which the input needs to appear.
Defining an image selector input
Creating a theme setting that features an image selector is a little bit different than doing so for simple text fields.
The setting is registered in exactly the same way.
![]() Registering an image-based setting
Registering an image-based setting
// Register another setting "company_logo"
        $wp_customize->add_setting( 'company_logo',
            array(
                'default'    => '',
                'type'       => 'theme_mod',
                'capability' => 'edit_theme_options',
                'transport'  => 'refresh',
            )
        );
However, to define the image selector input, you need to use the following.
![]() Defining an image selector input
Defining an image selector input
// Define an image upload field for setting "company_logo"
        $wp_customize->add_control( new WP_Customize_Image_Control( // <- Important: to use image control we use WP_Customize_Image_Control() instead of WP_Customize_Control()
            $wp_customize,
            'ts_company_logo_control',
            array(
                'label'      => __( 'Upload a logo', 'theme_name' ),
                'settings'   => 'company_logo',
                'section'    => 'ts_company_details',
            )
        ) );
As you can see, for images, you need to use the WP_Customize_Image_Control function instead of the WP_Customize_Control one.
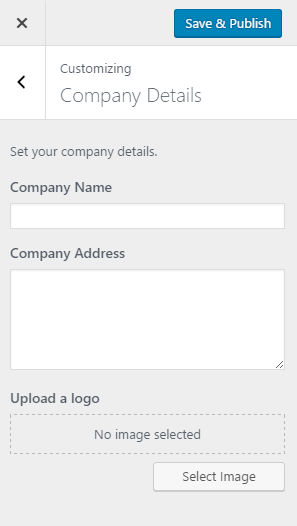
Custom settings in the Customizer
And this is how Company Details settings will look like on the Appearance -> Customize page.
Registering the shortcode to output the custom setting
Finally, you need a way to actually use the custom settings your theme provides. To do this, you can register a custom shortcode that outputs your custom theme settings.
In this example, we register a print-theme-setting shortcode, which takes two arguments:
- id (required) – the ID of a custom setting we want to output.
- default (optional) – what to show if a setting has no value set.
The following example displays how this shortcode is used to output a “Company Name”.
[print-theme-setting id=”company_name” default=”Company name not set”]
OK, let’s see how to register a custom shortcode like that!
As you can see, the custom shortcode is registered using the add_shortcode function. You set your shortcode name first, and then specify the shortcode_print_theme_setting function which the shortcode uses to output the necessary data.
Then, you use the shortcode_atts WordPress function to get the value of the setting specified by the shortcode’s id attribute.
The last part of the function checks if the targeted setting has any value set and prints it, otherwise, it prints the value set by the shortcode’s default attribute, if it is set.
Using the custom shortcode
Once the custom theme settings and the shortcode to output them are working, you can use them wherever you want on your site.
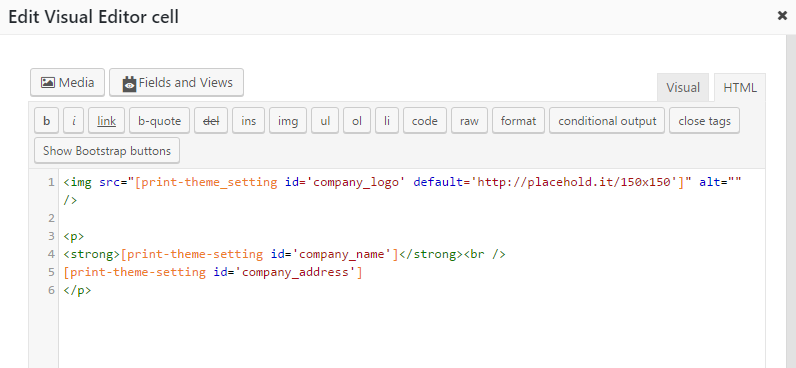
In our example, we used the shortcode to output the “Company Details” in our theme’s footer, by editing the appropriate layout.
| Shortcode usage in a layout | Front-end result |
 |
 |
Putting it all together
After going through all the parts necessary to create custom theme settings and a way to output them, you can find the whole code in the following snippet (click the title to expand the code).
Getting help
If you run into any trouble while following this tutorial, please open a ticket in our Professional Support Forum. Our supporters will be happy to help you.