Adding Toolset Blocks to the WooCommerce My Account Page
You cannot easily edit the main content of the WooCommerce "My Account" page. However, you can customize it with Toolset by adding blocks before or after it.
Let’s go over the most popular use-cases for customizing the WooCommerce “My Account” page with Toolset.
Hide Additional Content from Visitors
Before actually adding anything to the “My Account” page, let’s make sure we display additional content only to logged-in Customers. Remember, visitors that are not logged-in could also reach this page. In this case, the custom content you add to this page wouldn’t make sense and most of it would render empty.
Steps to display custom content on the “My Account” page only for Customer and Administrator roles:
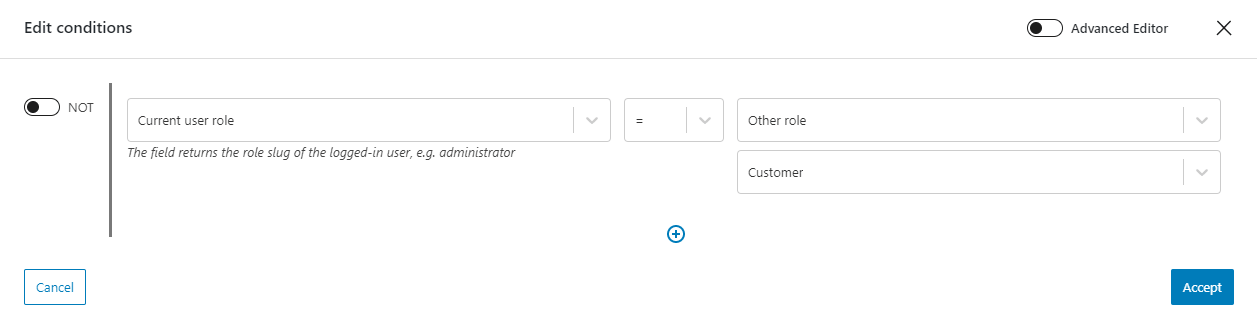
Insert the Toolset Conditional block. Click the button to add conditions and a pop-up dialog appears.
In the left dropdown, select the Current user role option.
In the right dropdown, select the Other role option.
In the new dropdown that appears, select Customer.
Using the Toolset Conditional block to display content only to users with a Customer role
You will probably want the site’s administrator to also see this content on the front-end.
Still in the same dialog, click the plus button to add another condition.
This time, select Other role → Administrator.
That’s it, click Accept and then put all your additional custom content inside the Conditional block.
“My Account” page is a sensible place to show the current user a list of posts that they have submitted.
Use the following steps to create such View:
Edit the “My Account” page.
Insert the View block either before or after the block containing the woocommerce_my_account shortcode.
Create a new View, select the type of content you want to list, and design its output using blocks.
Click to select the main View block and in the right sidebar, expand the Content Selection section.
In the Query Filters sub-section, click Add a filter.
In the dialog that appears, select to filter by Post author and click Add query filter.
In the right sidebar, select the Post author is the same as the logged in user option and click Save.
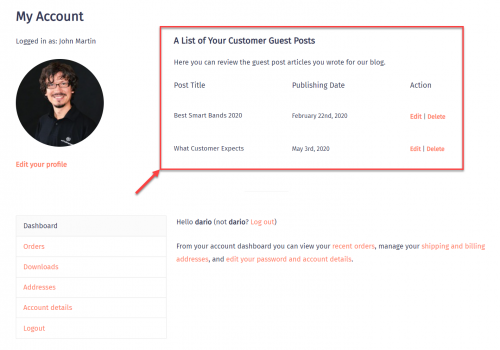
Users will now see a list of the posts they submitted.
WooCommerce “My Account” page with a list of posts submitted by the current user
You might want to also allow them to edit or delete their posts. You can learn more about this in the lesson about allowing users to manage their items.
Add Extra User Fields to the My Account Page
WordPress provides some basic fields for user profiles like name, nickname, email, website, and more.
With Toolset, you can add any custom fields to your user profiles:
Go to Toolset → Custom Fields, click the User Fields tab, and then the Add New Group button.
Give a name to your new group of custom user fields.
Click the Add New Field button to add a field. You can add any number of fields.
Now, all user profiles will include the fields you added.
Of course, you can then also display them on the front-end:
Edit the “My Account” page.
Insert the Fields and Text block either before or after the block containing the woocommerce_my_account shortcode. You can use any number of Fields and Text blocks.
In the editor of the Fields and Text block, click the Views button.
In the pop-up dialog that appears, you can find your custom group of user fields. Click the user field you want to insert.
Select the option to display the field for the current logged in user and click Insert shortcode.
Custom user fields displayed on the WooCommerce “My Account” page
Further Customization of the Custom Content
Besides adding custom content to the “My Account” page, you can use any 3rd-party blocks for designing.
For example, if you want to display all your extra custom information inside tabs, we suggest using Kadence Blocks. Their Tabs block provides horizontal and vertical tabs with great designing options.
Toolset allows you to display Dynamic Sources, like custom fields, inside any text blocks like headings, buttons, and more. This includes WordPress core blocks, Toolset blocks, and popular block plugins.
To display any Dynamic Source inline, insert or select a block with a text input and look for the Inline Fields button. Dropdown menus will appear, allowing you to select a Dynamic Source.